知而智

  • 首页

  • 归档

  • 分类

  • 关于

reids

发表于 2017-12-15 | 分类于 开源代码学习

redis和nginx一直是我认为很优秀的开源项目,也是我看的较多的开源实现。下面从几个方面简单说说redis实现。

  • redis介绍
  • 常用数据类型
  • io模型
  • 通信协议
  • 疑问解答

redis

redis是一个基于内存的数据库,现有的数据类型满足大部分公司的开发需求,性能也满足一般公司使用。

redis虽然是一个基于内存的数据库,但他提供了两种可以持久化的方式。这种持久化的机制避免的redis服务
器重启丢失数据的问题,但也不能完全避免数据不会丢失(这里讨论的是非集群模式)。

redis提供的内存持久有rdb快照和基于aof的文件方式,默认是rdb快照,可以通过配置修改快照更新的方式,
这两种方式都是fork进程执行backup的。下面我们讨论redis里面的数据类型

数据类型

我们先来看下redis源码说明。redis里的值有5种基础的类型,任何一个值都是以redisObject存在,并以下面不
同的编码方式编码成一个redisObject。

server.h

1
2
3
4
5
6
7
8
9
10
11
12
13
14
15
16
17
18
19
20
21
22
23
24
25
26
27
28
29
30
31
32
33
34
35
36
37
38
39
40
41
42
43
44
45
/*-----------------------------------------------------------------------------
* Data types
*----------------------------------------------------------------------------*/
/* A redis object, that is a type able to hold a string / list / set */
/* The actual Redis Object */
#define OBJ_STRING 0
#define OBJ_LIST 1
#define OBJ_SET 2
#define OBJ_ZSET 3
#define OBJ_HASH 4
// ...
/* Objects encoding. Some kind of objects like Strings and Hashes can be
* internally represented in multiple ways. The 'encoding' field of the object
* is set to one of this fields for this object. */
#define OBJ_ENCODING_RAW 0 /* Raw representation */
#define OBJ_ENCODING_INT 1 /* Encoded as integer */
#define OBJ_ENCODING_HT 2 /* Encoded as hash table */
#define OBJ_ENCODING_ZIPMAP 3 /* Encoded as zipmap */
#define OBJ_ENCODING_LINKEDLIST 4 /* No longer used: old list encoding. */
#define OBJ_ENCODING_ZIPLIST 5 /* Encoded as ziplist */
#define OBJ_ENCODING_INTSET 6 /* Encoded as intset */
#define OBJ_ENCODING_SKIPLIST 7 /* Encoded as skiplist */
#define OBJ_ENCODING_EMBSTR 8 /* Embedded sds string encoding */
#define OBJ_ENCODING_QUICKLIST 9 /* Encoded as linked list of ziplists */
#define LRU_BITS 24
#define LRU_CLOCK_MAX ((1<<LRU_BITS)-1) /* Max value of obj->lru */
#define LRU_CLOCK_RESOLUTION 1000 /* LRU clock resolution in ms */
#define OBJ_SHARED_REFCOUNT INT_MAX
typedef struct redisObject {
unsigned type:4;
unsigned encoding:4;
unsigned lru:LRU_BITS; /* LRU time (relative to server.lruclock) or
* LFU data (least significant 8 bits frequency
* and most significant 16 bits decreas time). */
int refcount;
void *ptr;
} robj;

String

字符串类型是redis里最基础的值。字符串是二进制安全的,也就是说这样的字符串可以包含任意的数据,比如一张JPEG的图片或一个序列化的Ruby对象。字符串值最大的长度是512MB。

在redis里面,你可以用字符串做一些有趣的事情。比如:

  • 字符串可以使用类似INCR的命令(INCR DECR INCRBY)作为原子计数
  • 用APPEND命令向字符串的值里追加一些字符串
  • 可以用GETRANGE和SETRANGE像随机访问数组一样获取或改变字符串里面的内容
  • 少量的空间可以编码大量的数据或者可以使用GETBIT和SETBIT来创建一个Redis backed Bloom Filter

常用的命令如下:

INCR GET SET STRLEN等命令

Lists

列表是一个简单的字符串列表,按插入的顺序排序。往列表增加一个元素可能从列表的头部或者从列表的尾部添加。

LPUSH命令在列表的头部插入一个新的元素,RPUSH则是往列表尾部插入一个新的元素。当在一个不存的在key上
执行以上操作后会生成一个新的列表。同样的,执行对应的操作key所对应的空间会被删除。

这些命令都是非常方便的语义,因此,如果命令带有一个不存的key时,所有的列表相关的命令在空列表里面会执行和他们名称相同的操作,
一些列表相关的命令使用例子以及结果如下:

1
2
3
LPUSH mylist a # now the list is "a"
LPUSH mylist b # now the list is "b","a"
RPUSH mylist c # now the list is "b","a","c" (RPUSH was used this time)

开表最大的长度是232-1(4294967295,超过40亿).

从时间复杂角度来看列表的主要特征是他在列表的首尾进行插入和删除的时间常数。即使列表里面有数亿个元素,访问里边的元素是非常快的,
但访问一个非常巨大的列表来说,越访问后面的速度会变得越慢,它的时间复杂度为O(N)

你可以用列表做一些有趣的事情,比如:

  • 在社交网络中建立一个时间线,基于用户的时间线使用LPUSH增加新的元素,使用LRANGE来获取最近插入的元素。

  • LPUSH结合LTRIM可以创建一个不会超过指定元素的列表,只记录最近N个元素

  • 列表可以作为一个消息传递原语,例如著名的Resque Ruby图书馆创建后台作业

  • 你可以做更多关于列表相关的事,这种数据类型支持许多命令,包含阻塞的命令,如:BLPOP

Sets

Set是一个没有排序的字符串的一个集合。新增、删除以及判断是成员是否成在的时间复杂度可以是O(1)(这个时间常量不管集合里面的无数个数)。

集合拥有不允许重复元素的特性。同一个元素增加多次的结果只会有一个元素存在集合里面,从实践的角度来说往集合里面增加一个元素的时候不需要主动判断元素是否已经存在。

一个关于集合非常有趣的事情是,它支持一些服务器用来计算已经存在的集合的命令,这样你可以在短的时间内完成集合的合并、交集,差异。

集合中最大的元素个数是232-1(4294967295,超过40亿).

你可以用集合做许多有趣的事情,例如:

  • 可以用集合记录唯一的东西。想要知道访问一篇博客的所有唯一的IP地址? 每次一个页面查看的时候简单的使用SADD加入IP。你确定重复的IP将不会被插入。

  • 集合对代表关系有好处。你可以用集合代表每个一标签创建一个标签系统。
    然后你可以用SADD命令给所有拥有一个标签的对象的所有ID加到一个集合里面代表这特殊的标签。如果你想所有对象的所有ID在同一时间拥有三个不同的标签,那就使用SINTER

  • 你可以使用SPOP或SRANDMEMBER命令随机获取集合里面的元素。

Hashes

Hash是字符串字段和字符串的值的一个映射,因此Hash用来代表对象类型是完美的数据类型(举例:一个拥有多个字段的用户,如名字、姓氏、年龄以及更多)

1
2
3
4
5
@cli
HMSET user:1000 username antirez password P1pp0 age 34
HGETALL user:1000
HSET user:1000 password 12345
HGETALL user:1000

拥有一些字段的hash以花费非常少的空间方式存储,所以你可以在一个小的Redis实例里面存储数以百万计的对象。

然而hash主要被用来当作对象存储,它们拥有存储多个元素的能力,所以你同样可以为其它更多任务使用hash

每一个hash最多可以存储232-1个field-value组(超过40亿).

Sorted sets

有序集合和没有重复的字符串集合非常相似。区别是有序集合的每个一个成员都关联一个分值,这个分值被用来使有序集合保持从小到大的顺序。因此成员是唯一的,但分值可能重复。

通过有序集合,你可以非常快的方式新增、删除或更新一个元素(在时间上与集合里面的元素个数成对比).

因为元素在集合里面是有序的,并非后续才有序,你同样可以根据分数或排名很快速的获取范围。访问有序集合中间元素也非常快,所以你可以使用有序集合作为一个没有重复无素的智能列表,在这里你可以快速访问你想要访问的任何东西: 有序的元素、快速存在检测,快速访问中间元素!

简而言之,使用有序集合你可以完成许多任务,并拥有在其它种类的数据库里面不能达到的好的性能。

你可以用有序集合做如下事情:

  • 在大型在线游戏中做一个排行榜,在这里每一次一个新的分数提交时,你用ZADD更新它。使用ZRANGE可以容易的获取排名靠前的玩家,你同样可以使用ZRANK获取一个玩家自己的排名。结合ZRANK和ZRANGE你可以显示玩家以及对应的分数。所有操作都非常快。

  • 有序集合经常被用来查找存在redis里面的数据。比如你有许多hash代表玩家,可以使用以玩家年龄作为分数,玩家id作为值的元素的一个集合。这样使用ZRANGEBYSCORE将会变得平常并可以根据给的年龄段很快的获取所有的玩家

io模型

服务器是基于epoll的io模型,redis是单进程的事件模型驱动的架构设计。处理两类事件

  • 时间事件
  • 网络IO事件

对于redis里面IO事件它支持select、eploo、kqueue、evport多种io监听机制。并封装了一套IO的接口

ae.h

1
2
3
4
5
6
7
8
9
10
11
12
13
14
15
16
17
18
19
20
21
22
23
24
25
26
27
28
29
30
31
32
33
34
35
36
37
38
39
40
41
42
43
44
45
46
47
48
49
50
51
52
53
54
55
56
57
58
59
60
61
62
63
64
65
66
67
68
69
70
71
72
73
74
75
76
77
78
79
80
81
82
83
84
85
86
87
88
89
90
91
92
93
94
95
96
97
98
99
100
101
102
103
104
105
106
107
108
109
110
111
112
113
114
115
116
117
118
119
120
121
122
123
/* A simple event-driven programming library. Originally I wrote this code
* for the Jim's event-loop (Jim is a Tcl interpreter) but later translated
* it in form of a library for easy reuse.
*
* Copyright (c) 2006-2012, Salvatore Sanfilippo <antirez at gmail dot com>
* All rights reserved.
*
* Redistribution and use in source and binary forms, with or without
* modification, are permitted provided that the following conditions are met:
*
* * Redistributions of source code must retain the above copyright notice,
* this list of conditions and the following disclaimer.
* * Redistributions in binary form must reproduce the above copyright
* notice, this list of conditions and the following disclaimer in the
* documentation and/or other materials provided with the distribution.
* * Neither the name of Redis nor the names of its contributors may be used
* to endorse or promote products derived from this software without
* specific prior written permission.
*
* THIS SOFTWARE IS PROVIDED BY THE COPYRIGHT HOLDERS AND CONTRIBUTORS "AS IS"
* AND ANY EXPRESS OR IMPLIED WARRANTIES, INCLUDING, BUT NOT LIMITED TO, THE
* IMPLIED WARRANTIES OF MERCHANTABILITY AND FITNESS FOR A PARTICULAR PURPOSE
* ARE DISCLAIMED. IN NO EVENT SHALL THE COPYRIGHT OWNER OR CONTRIBUTORS BE
* LIABLE FOR ANY DIRECT, INDIRECT, INCIDENTAL, SPECIAL, EXEMPLARY, OR
* CONSEQUENTIAL DAMAGES (INCLUDING, BUT NOT LIMITED TO, PROCUREMENT OF
* SUBSTITUTE GOODS OR SERVICES; LOSS OF USE, DATA, OR PROFITS; OR BUSINESS
* INTERRUPTION) HOWEVER CAUSED AND ON ANY THEORY OF LIABILITY, WHETHER IN
* CONTRACT, STRICT LIABILITY, OR TORT (INCLUDING NEGLIGENCE OR OTHERWISE)
* ARISING IN ANY WAY OUT OF THE USE OF THIS SOFTWARE, EVEN IF ADVISED OF THE
* POSSIBILITY OF SUCH DAMAGE.
*/
#ifndef __AE_H__
#define __AE_H__
#include <time.h>
#define AE_OK 0
#define AE_ERR -1
#define AE_NONE 0
#define AE_READABLE 1
#define AE_WRITABLE 2
#define AE_FILE_EVENTS 1
#define AE_TIME_EVENTS 2
#define AE_ALL_EVENTS (AE_FILE_EVENTS|AE_TIME_EVENTS)
#define AE_DONT_WAIT 4
#define AE_NOMORE -1
#define AE_DELETED_EVENT_ID -1
/* Macros */
#define AE_NOTUSED(V) ((void) V)
struct aeEventLoop;
/* Types and data structures */
typedef void aeFileProc(struct aeEventLoop *eventLoop, int fd, void *clientData, int mask);
typedef int aeTimeProc(struct aeEventLoop *eventLoop, long long id, void *clientData);
typedef void aeEventFinalizerProc(struct aeEventLoop *eventLoop, void *clientData);
typedef void aeBeforeSleepProc(struct aeEventLoop *eventLoop);
/* File event structure */
typedef struct aeFileEvent {
int mask; /* one of AE_(READABLE|WRITABLE) */
aeFileProc *rfileProc; /* io读的回调 */
aeFileProc *wfileProc; /* io写的回调 */
void *clientData;
} aeFileEvent;
/* Time event structure */
typedef struct aeTimeEvent {
long long id; /* time event identifier. */
long when_sec; /* seconds */
long when_ms; /* milliseconds */
aeTimeProc *timeProc;
aeEventFinalizerProc *finalizerProc;
void *clientData;
struct aeTimeEvent *next;
} aeTimeEvent;
/* A fired event */
typedef struct aeFiredEvent {
int fd;
int mask;
} aeFiredEvent;
/* State of an event based program */
typedef struct aeEventLoop {
int maxfd; /* highest file descriptor currently registered */
int setsize; /* max number of file descriptors tracked */
long long timeEventNextId;
time_t lastTime; /* Used to detect system clock skew */
aeFileEvent *events; /* Registered events 所有已经建立tcp连接的fd */
aeFiredEvent *fired; /* Fired events 有io事件需要处理的fd*/
aeTimeEvent *timeEventHead; /* 定时任务的列表 */
int stop;
void *apidata; /* This is used for polling API specific data 存储epool_fd 以及从内核获取所有就绪io事件的fd */
aeBeforeSleepProc *beforesleep;
} aeEventLoop;
/* Prototypes */
aeEventLoop *aeCreateEventLoop(int setsize);
void aeDeleteEventLoop(aeEventLoop *eventLoop);
void aeStop(aeEventLoop *eventLoop);
int aeCreateFileEvent(aeEventLoop *eventLoop, int fd, int mask,
aeFileProc *proc, void *clientData);
void aeDeleteFileEvent(aeEventLoop *eventLoop, int fd, int mask);
int aeGetFileEvents(aeEventLoop *eventLoop, int fd);
long long aeCreateTimeEvent(aeEventLoop *eventLoop, long long milliseconds,
aeTimeProc *proc, void *clientData,
aeEventFinalizerProc *finalizerProc);
int aeDeleteTimeEvent(aeEventLoop *eventLoop, long long id);
int aeProcessEvents(aeEventLoop *eventLoop, int flags);
int aeWait(int fd, int mask, long long milliseconds);
void aeMain(aeEventLoop *eventLoop);
char *aeGetApiName(void);
void aeSetBeforeSleepProc(aeEventLoop *eventLoop, aeBeforeSleepProc *beforesleep);
int aeGetSetSize(aeEventLoop *eventLoop);
int aeResizeSetSize(aeEventLoop *eventLoop, int setsize);
#endif

redis服务器处理事件的主入口在这里,每次进入事件循环之前先执行了一个函数(持入化的相关的流程,以及回复需要回复的client等),然后再去执行定时事件和客户端发过来的命令。

1
2
3
4
5
6
7
8
void aeMain(aeEventLoop *eventLoop) {
eventLoop->stop = 0;
while (!eventLoop->stop) {
if (eventLoop->beforesleep != NULL)
eventLoop->beforesleep(eventLoop);
aeProcessEvents(eventLoop, AE_ALL_EVENTS);
}
}
1
2
3
4
5
6
7
8
9
10
11
12
13
14
15
16
17
18
19
20
21
22
23
24
25
26
27
28
29
30
31
32
33
34
35
36
37
38
39
40
41
42
43
44
45
46
47
48
49
50
51
52
53
54
55
56
57
58
59
60
61
62
63
64
65
66
67
68
69
70
71
72
73
74
75
76
77
78
79
80
81
82
83
84
85
86
87
88
89
90
91
92
/* Process every pending time event, then every pending file event
* (that may be registered by time event callbacks just processed).
* Without special flags the function sleeps until some file event
* fires, or when the next time event occurs (if any).
*
* If flags is 0, the function does nothing and returns.
* if flags has AE_ALL_EVENTS set, all the kind of events are processed.
* if flags has AE_FILE_EVENTS set, file events are processed.
* if flags has AE_TIME_EVENTS set, time events are processed.
* if flags has AE_DONT_WAIT set the function returns ASAP until all
* the events that's possible to process without to wait are processed.
*
* The function returns the number of events processed. */
int aeProcessEvents(aeEventLoop *eventLoop, int flags)
{
int processed = 0, numevents;
/* Nothing to do? return ASAP */
if (!(flags & AE_TIME_EVENTS) && !(flags & AE_FILE_EVENTS)) return 0;
/* Note that we want call select() even if there are no
* file events to process as long as we want to process time
* events, in order to sleep until the next time event is ready
* to fire. */
if (eventLoop->maxfd != -1 ||
((flags & AE_TIME_EVENTS) && !(flags & AE_DONT_WAIT))) {
int j;
aeTimeEvent *shortest = NULL;
struct timeval tv, *tvp;
if (flags & AE_TIME_EVENTS && !(flags & AE_DONT_WAIT))
shortest = aeSearchNearestTimer(eventLoop);
if (shortest) {
long now_sec, now_ms;
aeGetTime(&now_sec, &now_ms);
tvp = &tv;
/* How many milliseconds we need to wait for the next
* time event to fire? */
long long ms =
(shortest->when_sec - now_sec)*1000 +
shortest->when_ms - now_ms;
if (ms > 0) {
tvp->tv_sec = ms/1000;
tvp->tv_usec = (ms % 1000)*1000;
} else {
tvp->tv_sec = 0;
tvp->tv_usec = 0;
}
} else {
/* If we have to check for events but need to return
* ASAP because of AE_DONT_WAIT we need to set the timeout
* to zero */
if (flags & AE_DONT_WAIT) {
tv.tv_sec = tv.tv_usec = 0;
tvp = &tv;
} else {
/* Otherwise we can block */
tvp = NULL; /* wait forever */
}
}
numevents = aeApiPoll(eventLoop, tvp);
for (j = 0; j < numevents; j++) {
aeFileEvent *fe = &eventLoop->events[eventLoop->fired[j].fd];
int mask = eventLoop->fired[j].mask;
int fd = eventLoop->fired[j].fd;
int rfired = 0;
/* note the fe->mask & mask & ... code: maybe an already processed
* event removed an element that fired and we still didn't
* processed, so we check if the event is still valid. */
if (fe->mask & mask & AE_READABLE) {
rfired = 1;
fe->rfileProc(eventLoop,fd,fe->clientData,mask);
}
if (fe->mask & mask & AE_WRITABLE) {
if (!rfired || fe->wfileProc != fe->rfileProc)
fe->wfileProc(eventLoop,fd,fe->clientData,mask);
}
processed++;
}
}
/* Check time events */
if (flags & AE_TIME_EVENTS)
processed += processTimeEvents(eventLoop);
return processed; /* return the number of processed file/time events */
}

aeProcessEvents函数主要是处理定时任务的事件和网络IO事件,先找时间最近的一个定时任务,如果时间到了aePoll的时间参数为0,表示立即返回,说明优先执行定时任务然后再等下次循环进入。

通信协议

redis的协议很简单,就基本的raw字符串,然后有自己的固定格式,按这格式读写就可以和redis服务器完成通信和后续的任务。

只要和redis服务器建立tcp连接后,知道他消息格式的话,直接写入raw字符串就可以执行对应的命令。我们也可以通过解析这
样的消息格式就可以实现和服务器通信的目的。

redis里面用的协议名称叫RESP(REdis Serialization Protocol),它支持以下几种数据类型:

  • Strings 协议里的第一字符为 “+”
  • Errors 协议里的第一字符为 “-“
  • Integers 协议里的第一字符为 “:”
  • Bulk Strings 协议里的第一字符为 “$”
  • Arrays 协议里的第一字符为 “*”

客户端发给服务器的命令是一个Bulk String的数组,服务器回的包含以上所例举的。

Strings

字符串类型被编码成下面的方式:”+”后面跟具体的字符串内容,中间不包含CR或者LF字符(没有新的行才是允许的),最后台CRLF(\r\n)结尾.

字符串类型用最小的开销来传输非二进安全的字符串。比如许多redis命令执行成功时仅回复”OK”,这样的字符串类型被编码成以下5个字节:

1
"+OK\r\n"

为了发送二进制安全的字符串,Bulk Strings用来替代Strings的功能。

当redis服务器回复一个字符串类型时,一个redis客户端的库应该返回+后边的字符串,不包括CRLF。

Errors

RESP对于错误有一个特定的数据类型。实际上errors非常像字符串类型,只是用-替代了+.两者的区别在于errors被客户端用作异常处理,错误的数据类型里面的字符串就是它的错误消息.

错误消息的格式如下:

1
"-Error message\r\n"

只有在发生一些错误的时候才会回复错误消息,比方说,如果执行的操作与你对应的数据类型不同时,或者你执行的命令不存在以及其它情况。当收到一个错误回复的时候redis客户端应该抛出一个异常。

下面是一个错误回包的一个例子:

1
2
-ERR unknown command 'foobar'
-WRONGTYPE Operation against a key holding the wrong kind of value

从第一个字符-到第一个空格或新的行,代表了返回的错误类型。这是redis常用的惯例,但并不是所有协议里面的错误格式。

举例说明,ERR是常用的错误类型,而WRONGTYPE是更具体的错误,这种错误应用在当客户端执行一个操作对于错误的数据类型时候。这种错误类型叫错误前缀,它是一种允许客户端理解服务器回复的错误类型的方式,而不依赖服务器回复的具体内容,这可能会随着时间改变。

对于不同的错误类型,一个客户端的实现可能会返回不同的异常,也可能会通过直接返回错误的字符串描述内容给调用者提供一个常用的方式来定位错误

然而,像这样一个特征不应该考虑至关重要因为它很少有用,一个有限的客户端实现可能简单的返回常用的错误条件,比如false.

Integers

这种类型是以CRLF结尾的字符串代表一个interger,以一个:字节做为前缀。比如”:0\r\n”,或者”:1000\r\n”都是回复的整型类型.

许多redis命令都回复Intergers,比如INCR,LLEN以及LASTSAVE.

返回整形没有什么特殊的意义,对于INCR是一个增量值,对LASTSAVE是一个Unix time等等。然而,返回的整数确定是在有符号的64位整型的范围.

回复整形在回得true或false的时候使用也广泛。像EXISTS或SISMEMBER命令将会返回1代表true,0代表false.

像其它SADD,SREM以及SETNX,如果命令实际执行成功会返回1,否则返回0.

下面命令会回复一个整型:

1
2
SETNX DEL EXISTS INCR INCRBY DECR DECRBY DBSIZE LASTSAVE
RENAMEX MOVE LLEN SADD SREM SISMEMBER SCARD

Bulk Strings

Bulk Strings被用来代表一个独立的二进制安全的最大长度为512M的字符串

Bulk Strings被编码成下面的方式:

  • $后面跟随组成字符串内容的字节个数,以CRLF结尾
  • 实际的字符串内容
  • 最后一个CRLF

所以字符串”foobar”被编码成:

1
"$6\r\nfoobar\r\n"

空字符串如下:

1
"$0\r\n\r\n"

Bulk Strings可以用来特殊的格式来表示一个不存在的值,这样的值代表了一个Null值。这种特殊的格式的长度为-1,后边没有数据,所以一个Null值如下所示:

1
"$-1\r\n"

这叫做Null Bulk String.

当服务器回复一个Null Bulk String,客户端的API不应该返回一个空字符串,而是一个空对象。
比如一个Ruby的客户端应该返回一个nil值,而C实现的客户端应该返回NULL(或者在回复的对象里设置一个特殊的标志),以及等等

Arrays

客户端使用的是Arrays协议向服务器发送命令。相似的Redis命令使用Arrays协议返回元素的一个合集给客户端。一个LRANGE命令返回列表的例子.
Clients send commands to the Redis server using RESP Arrays. Similarly certain Redis commands returning collections of elements to the client use RESP Arrays are reply type. An example is the LRANGE command that returns elements of a list.

使用下面的格式返回一个Arrays:

  • 前面一个*,后面跟随数组里面元素个数的十进制数值,再接着一个CRLF
  • 数组里面的元素是其它数据类型
1
"*0\r\n"

当一个包含”foo”和”bar”两个元素的数组被编码成:

1
"*2\r\n$3\r\nfoo\r\n$3\r\nbar\r\n"

你可以看到数组里面在*<count>CRLF的部分是由其它的数据类型连续组成的。比如一个包含三个integer的数组被编码成如下:

1
"*3\r\n:1\r\n:2\r\n:3\r\n"

数组类型同样可以包含不同的其它类型,没有要求数组里面的元素都是相同的类型。比如,一个包含四个integer的列表和一个bulk string被编码成如下:

1
2
3
4
5
6
7
*5\r\n
:1\r\n
:2\r\n
:3\r\n
:4\r\n
$6\r\n
foobar\r\n

换成多行是为了方便阅读

第一行内容*5\r\n说明后面接着有5个元素。每一个回复构成了Multi Bulk用作传播。

Null Array的概念同样存在,指定一个空值是可选的(通常使用一个Null Bulk String,由于历史原因我们有两种格式).

比如执行BLPOP命令超时后,服务器返回一个count为-1的空数据,格式如下:

1
"*-1\r\n"

redis服务器回服一个空数组里,redis客户端应该返回一个空对象而不是一个空数组。很有必要来区分空列表和不同的条件(比如BLPOP命令超时)。

在RESP协议里面数组是可以嵌套使用的。比如一个包含两个数组的数组被编码成如下:

1
2
3
4
5
6
7
8
*2\r\n
*3\r\n
:1\r\n
:2\r\n
:3\r\n
*2\r\n
+Foo\r\n
-Bar\r\n

这个说明,一个数组里面包含一个有三个整型的数组以及一个两个字条串类型的数组。

Null elements in Arrays

数组里面的单个元素可能为空。在redis回复的包里用来说明这个元素被丢失且不为空字符串。这个可能会发生在sort对get模糊匹配时指定的key不存在时进行排序时。回复一个包含空元素数组的例子:

1
2
3
4
5
6
*3\r\n
$3\r\n
foo\r\n
$-1\r\n
$3\r\n
bar\r\n

数组中第二个元素是空的。redis客户端应该返回类似下面的东西:

1
["foo",nil,"bar"]

思考

  • 一次client最大能发送多大的数据
  • 服务器最大回复的长度
1
2
3
4
5
6
7
8
/* Protocol and I/O related defines */
#define PROTO_MAX_QUERYBUF_LEN (1024*1024*1024) /* 1GB max query buffer. */
#define PROTO_IOBUF_LEN (1024*16) /* Generic I/O buffer size */
#define PROTO_REPLY_CHUNK_BYTES (16*1024) /* 16k output buffer */
#define PROTO_INLINE_MAX_SIZE (1024*64) /* Max size of inline reads */
#define PROTO_MBULK_BIG_ARG (1024*32)
#define LONG_STR_SIZE 21 /* Bytes needed for long -> str + '\0' */
#define AOF_AUTOSYNC_BYTES (1024*1024*32) /* fdatasync every 32MB */

一个redis client向服务器发送命令最大的长度为PROTO_MAX_QUERYBUF_LEN。
服务器一次回复最大的消息长度为PROTO_REPLY_CHUNK_BYTES,比方说hgetall比较大的时候就分多次发送
启停脚本

发表于 2017-12-13 | 分类于 脚本

我一直忍受不了没有效率的事情,公司同时负责服务器部署和发布的同事老久都没整一套好的脚本。
所以自己负责新项目的时候整了一套服务启停的脚本,经实践,个人觉得非常好用。所以在这里记录下。

需要依赖daemonize的一个程序
sudo yum install -y daemonize

/etc/init.d/functions 这里面还是有好多好东西的。

start-stop.sh

用来选择是启动还是停止某个进程还是所有的进程

1
2
3
4
5
6
7
8
9
10
11
12
13
14
15
16
17
18
19
20
21
22
23
24
25
26
27
28
29
30
31
32
33
34
35
36
37
38
39
40
41
42
43
44
45
46
47
48
49
50
51
52
53
54
55
56
57
58
59
60
61
62
63
64
65
66
67
68
69
70
71
72
73
74
75
76
77
#!/bin/bash
# 启停脚本
#
COLOR_RED='\033[0;31m'
COLOR_GREEN='\033[0;32m'
COLOR_RESET='\033[0m'
usage() {
echo "Usage: `basename $0` {start|stop|restart|force-stop|force-restart|status}" >&2
}
# At least three arguments are required.
if [ $# -lt 1 ]; then
usage
exit 5
fi
# 引入参数
. ./parameters.sh
server_len=$((${#SERVERS[@]}))
function choose_server() {
printf "\n========================================\n"
printf " Server Name List\n"
for ((i=0; i<server_len; i=i+1)); do
printf "%-10d %-20s\n" $i ${SERVERS[$(($i))]}
done
printf "========================================\n"
printf " Server Name List\n"
read -p "Please Enter server index[0-$(($server_len -1))](greater than $server_len instend of all): " server_index
if [[ "$server_index" =~ ^[0-9]?$ && $server_index -ge 0 ]]; then
return $server_index
else
echo -e "${COLOR_RED}invalidate input ${COLOR_RESET} : $COLOR_GREEN $server_index $COLOR_RESET";
exit 4;
fi
}
# 单个服还是所有,大于长度代表所有
choose_server
server_id=$?
PROG_NAME=''
PROG_ARGS=''
ACTION=$1
echo "will $ACTION server follow.."
if [ $server_id -lt $server_len ]; then
PROG_NAME=${SERVERS[$server_id]}
PROG_ARGS=${SERVER_PARAM[$PROG_NAME]}
echo "${PROG_NAME} -----> ${PROG_ARGS}"
else
for key in ${SERVERS[@]};do
echo "${key} -----> ${SERVER_PARAM[$key]}"
done
fi
read -n1 -p "Press insure. [y/n]" sure
echo -e "\nYour inputs: $sure"
if [ "$sure" == "y" ]; then
echo "$server_id $server_len"
if [ $server_id -lt $server_len ]; then
echo "$PROG_NAME $ACTION $PROG_ARGS"
#bash single.sh $PROG_NAME $ACTION $PROG_ARGS
else
for key in ${SERVERS[@]};do
PROG_NAME=${key}
PROG_ARGS=${SERVER_PARAM[$key]}
echo "$PROG_NAME $ACTION $PROG_ARGS"
#bash single.sh $PROG_NAME $ACTION $PROG_ARGS
done
fi
fi

single.sh

用来操作单个进程的脚本

1
2
3
4
5
6
7
8
9
10
11
12
13
14
15
16
17
18
19
20
21
22
23
24
25
26
27
28
29
30
31
32
33
34
35
36
37
38
39
40
41
42
43
44
45
46
47
48
49
50
51
52
53
54
55
56
57
58
59
60
61
62
63
64
65
66
67
68
69
70
71
72
#!/bin/bash
# 启停脚本
#
usage() {
echo "Usage: `basename $0` PROGRAM_NAME {start|stop|restart|status} PROGRAM_NAME" >&2
echo "Where: PROGRAM_NAME is alias for this process." >&2
echo " PROGRAM_ARG contain the executable file and command lind params." >&2
}
array=( $@ )
len=${#array[@]}
# At least three arguments are required.
if [ $len -lt 3 ]; then
usage
exit 5
fi
source /etc/init.d/functions
CUR_DIR=$(dirname $(realpath $0))
PROGRAM_NAME=${array[0]}
ACTION=${array[1]}
PROGRAM_ARGS=${array[@]:2:$len-1}
RETVAL=0
PID_FILE=".$PROGRAM_NAME.pid"
LOCK_FILE=".$PROGRAM_NAME.pid.lock"
LOG_FILE="$PROGRAM_NAME.log" #标准输出和错误输出
function start() {
daemonize -c $CUR_DIR -p $PID_FILE -l $LOCK_FILE -o $LOG_FILE -e $LOG_FILE -v $PROGRAM_ARGS
RETVAL=$?
[ $RETVAL = 0 ] && success || failure
echo
}
function stop(){
killproc -p $PID_FILE
RETVAL=$?
echo
rm -f $LOCK_FILE
}
function status_(){
status -p $PID_FILE
RETVAL=$?
}
case "$ACTION" in
start)
start;
;;
restart)
stop; sleep 1; start;
;;
stop)
stop
;;
status)
status_
;;
*)
usage
exit 4
;;
esac
exit $RETVAL

parameters.sh

用来配置哪些进程需要启动,以及进程启动的参数

1
2
3
4
5
6
7
8
9
10
11
12
13
14
15
16
17
18
19
20
21
22
23
24
25
26
27
#!/bin/bash
# 需要启动的服对应的名称和参数
#
CUR_DIR=$(dirname $(realpath $0))
LOGIN="login"
HALL="hall"
COUNT="count"
GAME10206="game10206"
# 定义哪些服需要启动
SERVERS=( \
${LOGIN} \
${HALL} \
${COUNT} \
${GAME10206})
declare -A SERVER_PARAM
SERVER_PARAM=([${LOGIN}]="$CUR_DIR/login --log_dir=log/login" \
[${HALL}]="$CUR_DIR/hall --log_dir=log/hall" \
[${COUNT}]="$CUR_DIR/count --log_dir=log/count" \
[${GAME10206}]="$CUR_DIR/game --log_dir=log/game10206")
for key in ${SERVERS[@]};do
echo "${key} -----> ${SERVER_PARAM[$key]}"
done

linux-concurrency

发表于 2017-10-11 | 分类于 linux-c

翻译

英语水平有限,工作空闲时间翻译。同时也学习了并发控制的一些知识

Concurrency in the Kernel (内核里面的并发控制)

Multiple threads of execution need to be synchronized to avoid data corruption and even system freezes.

对于有多线程的程序来说,如果有访问共享的东西的话会导致数据的错乱甚至会导致系统的冻结

As the Linux kernel has grown in complexity to support Symmetric Multi-Processing (SMP) and kernel preemption, more and more scenarios generate multiple threads of execution. Because threads can simultaneously operate on shared kernel data structures, access to such data structures has to be serialized. In this column, let’s learn the basics of protecting shared kernel resources from concurrent access, starting with a simple example and slowly introducing complexities like interrupts, kernel preemption, and SMP.

随着linux内核支持对称多处理系统,简称SMP(Symmetric Multi-Processing)以及内核抢占,使得内核变得更加的复杂,越来越多的地方会有多线程的出现,所以线程可以同时操作内核共享的数据结构,访问这些数据必须得串行。在这里,让我们从一个简单的示例来学习并发访问时内核共享资源的基本保护并慢慢的介绍更复杂的情况。比如:中断,内核抢占以及SMP.

Spinlocks and Semaphores (自旋锁和信息量)

A code area that accesses shared resources is called a critical section. Spinlocks and semaphores are the two mechanisms used to protect critical sections in the kernel.

一段访问共享资源的代码叫做临界区。在内核里面,自旋锁和信号量是用来保护临界区的两种机制。

A spinlock ensures that only a single thread enters a critical section at any time. Any other thread that wants to enter the critical section must wait “spinning its wheels” until the first thread exits. Listing One shows a basic use of a spinlock.

在任何时候,只会有一个获取自旋锁的线程进入临界区。其它线程想要进入临界区必须”自旋”等待,直到第之前获取到锁的线程释放。

Listing One: Basic spinlock usage

1
2
3
4
5
6
7
8
9
10
11
12
13
14
15
#include <linux/spinlock.h>
/* Initialize */
spinlock_t mylock = SPIN_LOCK_UNLOCKED;
/* Try to acquire the spinlock. This is inexpensive if there
* is no one inside the critical section. In the face of contention,
* spinlock() busy waits.
*/
spin_lock (&mylock);
/* … Critical Section … */
/* Release the lock */
spin_unlock (&mylock);

In contrast to spinlocks, which put threads into a spin if they attempt to enter a busy critical section, a semaphore puts each contending thread to sleep until its turn arrives to occupy the critical section.

如果线程尝试进入已经被自旋锁锁住的临界区,那么自旋锁会导致线程自旋。与自旋锁相比,信号量会让每个相互竞争锁的线程休眠直到他占有这
临界区

Because it’s bad to consume processor cycles to spin, semaphores are more suitable than spinlocks to protect critical sections when the estimated wait time is long. In semaphore terms, anything more than two context switches can be considered long, since semaphores have to switch out the contending thread to sleep, and switch it back in when it’s time to wake it up.

由于自旋占用cpu,当执行临界区的代码需要比较长时间时,信号量来保护临界区要比自旋锁更合适。在信号量的情况下,需要考虑超过两次上下文从信号量把竞争锁的线程成休眠到唤醒休眠的切换的时间。

Thus, in many cases, it’s easy to make a decision on whether to use a spinlock or a semaphore:

因此,在各种情况下,很容易作出决定用信号量还是用自旋锁来保护临界区:

  • If your critical section needs to sleep, you have no choice but to use a semaphore. It’s a deadly sin to schedule, preempt, or sleep on a wait queue after acquiring a spinlock.
  • 如果你的临界区需要休眠,除了用信号量别无选择。在获取自旋锁后如果在等待队列里被重新调度、抢占或休眠是致命的错误。

  • Since semaphores put the calling thread to sleep in the face of contention, you have no choice but to use spinlocks inside interrupt handlers.

  • 因为信号量在获取临界区是会导致调用线程休眠的,所以在中断处理程序里除了用自旋锁别无选择

Unlike spinlocks, which allow only a single thread inside a critical section at a time, semaphores can be configured to allow a predetermined number of threads into the critical section simultaneously. (However, semaphores that permit only a single thread at a time are more common in the kernel.) A semaphore that permits only a single thread at a time is called a mutex. Listing Two shows basic mutex usage.

每个时间点自旋锁只允许一个线程处于临界区,信号量是允许配置预先定义好的线程个数同时进入临界区(然而,在内核里面,每次只允许一个线程在临界区)。每个时间点只允许一个线程进入临界区的叫互斥量。

Listing Two: Basic Mutex Usage

1
2
3
4
5
6
7
8
9
10
11
12
13
14
15
16
17
18
* Architecture dependent */
#include <asm/semaphore.h>
/* Statically declare a mutex. To dynamically create
* a mutex, use init_MUTEX().
*/
static DECLARE_MUTEX (mysem);
/* Try to acquire the semaphore. This is inexpensive if there
* is no one inside the critical section. In the face of contention,
* down() puts the calling thread to sleep.
*/
down (&mysem);
/* … Critical Section … */
/* Release the semaphore */
up (&mysem);

To illustrate the use of locks, let’s start with a critical section that is present only in process context and gradually introduce complexities in the following order:

为了说明锁的使用,我们从一个进程上下文的临界区开始然后逐渐讨论以下复杂的情况:

  • Critical section present only in process context on a uniprocessor box running a non-preemptible kernel (P-UP-N). This is the simplest case and needs no locking.

  • 临界区只存在不可抢占的单核(P-UP-N)的进程上下文时,这种简单的情况下是不需要锁的。

  • Critical section present in process and interrupt contexts on a uniprocessor machine running a non-preemptible kernel (PI-UP-N).

  • 临界区存在不可抢占单核(PI-UP-N)的进程和中断上下文

  • Critical section present in process and interrupt contexts on a uniprocessor machine running a preemptible kernel (PI-UP-P).

  • 临界区存在可抢占单核(PI-UP-P)的进程和中断上下文

  • Critical section present in process and interrupt contexts on an SMP machine running a preemptible kernel (PI-SMP-P).

  • 临界区存在可抢占的多核(PI-SMP-P)的进程和中断上下文

除了第一种情况,其它三种是需要对临界区做保护的

Case Two: PI-UP-N

In the case of a critical section present only in process context on a uniprocessor box running a non-preemptible kernel case, you only need to disable interrupts to protect the critical region:

在临界区存在中断上下文的时候,你需要把中断禁止来保护这个临界区:

1
2
3
cli (); /* Disable Interrupts */
/* ... Critical Region ... */
sti (); /* Enable Interrupts */

However, if interrupts are already disabled when execution reaches cli(), sti() has the unpleasant side effect of re-enabling interrupts, rather than restoring interrupt state. This can be fixed with:

然而,如果执行到cli()这里里中断已经被禁止了,sti()恢复中断后会有意想不到的影响会出现,这个可以通过恢复中断状态修改:

1
2
3
4
5
6
7
8
unsigned long flags;
/* Point A: Disable Interrupts */
save_flags (flags);
cli ();
/* ... Critical Region ... */
/* Restore state to what it was at Point A above */
restore_flags (flags);

This latter code works correctly, regardless of the interrupt state when
execution reaches cli().

这个代码正确工作,当执行到cli()时忽略中断的状态.

Case Three: PI-UP-P

If preemption is enabled, mere disabling of interrupts won’t protect your critical region from being trampled. There is the possibility of multiple threads simultaneously using the critical section in process context. The solution, apparently, is to disable kernel preemption before the start of the critical section and re-enable it at the end. Spinlocks do that internally if CONFIG_PREEMPT is enabled:

如果内核是可以抢占的,仅仅只禁掉中断是不能保护你的临界区的,有可能多个线程在同一个进程上下文进入到同一临界区。很显然,解决方案是在进入临界区前禁用内核抢占然后在最后重新开启内核抢占。在可抢占的内核里面,自旋锁就是这样实现的:

1
2
3
4
5
/* Marker to turn OFF preemption */
spin_lock (&mylock);
/* ... Critical Region ... */
/* Marker to turn ON preemption */
spin_unlock (&mylock);

However, this still doesn’t prevent interrupt handlers from stomping through your critical section. Instead, use the IRQ variant of spinlocks:

然而,这仍然还是不能避免在临界区发生的中思。取而代之的是使用自旋锁的另一种实现IRQ:

1
2
3
4
5
6
7
8
9
10
11
12
13
14
unsigned long flags;
/*
* Point A:
* Save interrupt state.
* Disable interrupts and preemption.
*/
spin_lock_irqsave (&mylock, flags);
/* ... Critical Region ... */
/*
* Enable preemption. Restore interrupt state to that
* at Point A.
*/
spin_unlock_irqrestore (&mylock, flags);

Preemption state need not be restored to what it was at Point A, since the kernel does that for you via a variable called the preemption counter. The counter gets incremented whenever preemption is disabled (using the preempt_disable() function), and gets decremented whenever preemption is enabled (using the preempt_enable() function). Preemption kicks in only if the counter value is zero.

自从内核通过一个叫可抢占计数后,在Point A不需要保存抢占的状态。这个计数在抢占禁用(preempt_disable)时会增加,在启用(preempt_enable())时会减少计数。只有当这个计数为0的时候才是可以抢占的。

Case Three: PI-SMP-P

Now assume that the critical section executes on an SMP machine and that your kernel has been configured with CONFIG_SMP and CONFIG_PREEMPT turned on.

假设我们的临界区在一个内核已经开启SMP和可抢占的SMP机器上

In the scenarios discussed so far, the spinlock primitives have done little other than enable and disable preemption and interrupts. The actual lock features have been compiled away.

到目前为止讨论的场景中, 自旋锁原语除了启用和禁用抢占和中断之外, 没有做什么。实际上锁的功能已被编译成汇编了。

In the presence of SMP, the actual locking logic gets compiled in, and the spinlock primitives are rendered SMP-safe. The SMP-enabled semantics is:

在SMP的机器上,锁的实现逻辑是通过编译器实现的,自旋锁原语提供了SMP安全,启用SMP的语义是:

1
2
3
4
5
6
7
8
9
10
11
12
13
14
15
16
17
unsigned long flags;
/*
* Point A:
* Save interrupt state on the local CPU
* Disable interrupts on the local CPU
* Disable preemption
* Lock the section to regulate access by other CPUs
*/
spin_lock_irqsave (&mylock, flags);
/* ... Critical Region ... */
/*
* Enable preemption. Restore interrupt state to what
* it was at Point A for the local CPU.
* Release the lock.
*/
spin_unlock_irqrestore (&mylock, flags);

In the SMP case, only interrupts in the local CPU are disabled when the lock is acquired. If interrupts are not disabled in the local CPU, a deadlock might arise if an interrupt is generated while execution is in the middle of a critical section. (The interrupt handler sits in a tight spin, waiting for the lock to become available, but the critical section cannot complete until the interrupt handler itself finishes execution.) However, this danger of deadlock does not arise for interrupts generated on other CPUs, since an interrupt handler executing on processor A doesn’t prevent process context code on processor B from executing. The interrupt handler on processor A spins, waiting until processor B exits the critical section.

在SMP的情况下,当锁获取后只有当前CPU的中断会被禁用。如果当前CPU的中断没有被禁用,在执行临界区时产生另一个中断可能会产生一个死锁。(中断处理程序会处于紧急旋转状态,一直等待之前的锁被释,但是之前的临界区一直等着现有的中断程序处理的返回)。然而,在其它CPU上产生的中断不会出现死锁的危险,当一个中断程序在processor A上执行时不会阻止进程上下文的代码在processor B上的执行。中断处理程序在processor A一直旋转直到processor B离开临界区。

The kernel has specialized locking primitives in its repertoire that help improve performance under specific conditions. Using a mutual exclusion scheme tailored to your needs will make your code more powerful. Let’s take a look at some of the specialized exclusion mechanisms.

内核指令里有专门的锁定原语,在特定的条件下帮你提升性能。根据你的需要来使用一个互斥方案会使你的代码更加强大。让我们来看一些互斥机制。

Atomic Operators

Atomic operators are used to perform lightweight operations like bumping counters, conditional increments, and setting bit positions, in one shot. Atomic operations are guaranteed to be serialized and do not need locks for protection against concurrent access. The implementation of atomic operators is architecture-dependent.

原子操作被用作执行一些轻微的动作,比如:碰撞计数、条件增量和设置bit位的位置.简而言之,原子操作确保有序并且不需要锁来保护并发访问。原子操作的实现是基于系统架构的。

For example, to check whether there are any remaining data references before freeing a kernel network buffer (called an skbuff), the skb_release_data() routine defined in net/core/skbuff.c does the following:

举个例子,用来检查是否有剩余的数据引用在内核释放网络缓冲(被称为skbuff)的数据,skb_release_data()函数的实现在net/core/skbuff.c里,内容如下:

1
2
3
4
5
6
if (!skb->cloned ||
/* Atomically decrement and check the reference value */
atomic_dec_and_test(&(skb_shinfo(skb)->dataref))) {
/* ... */
kfree(skb->head);
}

While skb_release_data() is thus executing, another thread using the skbuff_clone() function (defined in the same file), might be simultaneously incrementing the data reference counter:

当skb_release_data()执行时,另一个线程可能同时增加这数据的引用计数通过使用skbuff_clone(在同一个文件中)函数:

1
2
3
4
5
6
/* .. */
/* Atomically bump the reference count */
atomic_inc(&(skb_shinfo(skb)->dataref));
/* .. */

The use of atomic operators protects the data reference counter from being trampled by these two threads. It also eliminates the hassle of using locks to protect a single integer variable from concurrent access.
The kernel also supports operators like set_bit(), clear_bit(), and test_and_set_bit(), to atomically manipulate a single bit.

使用原子操作保护数据的引用计数被多个线程碰撞。它还消除了使用来锁保护对单个整型变量的并发方问。
内核同样支持如:set_bit()、clear_bit()和test_and_set_bit()在一个bit位上执行原子操作

Reader-Write Locks

The reader-writer variant of a spinlock is another specialized concurrency regulation mechanism. If the usage of a critical section is such that separate threads either read or write, but don’t do both, a reader-writer lock is a natural fit.
Multiple reader threads are allowed inside a critical region simultaneously. Reader spinlocks are defined as:

自旋锁的一个变种——读写锁是是另外一个特定的并发机制。临界区的使用被分离出读和写的线程,读和写不能同时获得,读写锁是设计巧秒的。
多个读线程可以同时在一个临界区。读的自旋锁定义如下:

1
2
3
4
5
6
7
8
9
rwlock_t myrwlock = RW_LOCK_UNLOCKED;
/* Acquire reader lock */
read_lock (&myrwlock);
/* ... Critical Region ... */
/* Release lock */
read_unlock (&myrwlock);

However, if a writer thread enters a critical section, other reader or writer threads are not allowed inside. To use writer spinlocks, you’d write:

然而,当一个写的线程进入临界区时,其它尝试进入临界区的读或写的线程是不成功的。对写自旋锁的使用,你可能会这样使用:

1
2
3
4
5
6
7
8
9
rwlock_t myrwlock = RW_LOCK_UNLOCKED;
/* Acquire writer lock */
write_lock (&myrwlock);
/* ... Critical Region ... */
/* Release lock */
write_unlock (&myrwlock);

Look at the Internetwork Packet Exchange (IPX) routing code in net/ipx/ipx_route.c for a real life example of reader-writer spinlock usage. A reader-writer lock called ipx_routes_lock protects the IPX routing table from simultaneous access. Threads that need to look-up the routing table to forward packets don’t have to write to the table and can request reader locks. However, threads that need to add or delete entries from the routing table have to acquire writer locks. This improves performance since there will usually be far more instances of routing table look-ups than routing table updates.
Like regular spinlocks, reader-writer locks also have corresponding irq versions, namely, read_lock_irqsave(), read_lock_irqrestore(), write_lock_irqsave(), and write_lock_irqrestore(). The semantics of these functions are similar to that discussed for regular spinlocks.

通过net/ipx/ipx_route.c里面IPX路由代码的实现来体验下读写自旋锁的使用。一个叫ipx_routes_lock的读写锁用来保护IPX路由表的并发访问。线程需要遍历路由表来发送网络包,因为不需要对这路由表写,所以可以请求的是读锁。然而需要新增或删除路由表里面的数据需要获取写锁。这样将对性能有很大的提升,因为会查询路由表的次数会比写的次数多。
像常规的自旋锁一样,读写锁一样有相对应的irq版本,叫做read_lock_irqsave(),read_lock_irqrestor(),write_lock_irqsave()和 write_lock_irqrestore()。这些函数的语义和之前讨论的自旋锁用法一样。

Corresponding reader-writer flavors of semaphores are, down_read(), down_write(), up_read(), and up_write().
Sequence locks or seqlocks, introduced in the 2.6 kernel, are reader-writer locks where writers are favored over readers. Writer threads do not wait for readers who may be inside a critical section. Because of this, reader threads may discover that their critical section operation has failed, and may need to retry:

相对应的信息量的读写的方式有down_read(),down_write(),up_read()和up_write()。在2.6内核里面介绍的序号锁是写锁比读锁更受欢迎的读写锁。写的线程不需要等待在临界区的读线程。因此,读的线程可以发现他们的临界区操作失败然后可能需要重新获取:

1
2
3
4
do {
seq = read_seqbegin (&mylock);
/* ... Critical Section */
} while (read_seqtry (&mylock, seq));

Writers protect critical regions using write_seqlock() and write_sequnlock().
The 2.6 kernel introduced another mechanism called Read-Copy Update (RCU) that can yield improved performance in cases where readers far outnumber writers. The basic idea is that reader threads can execute without locking. Writer threads are more complex: each performs update operations on a copy of the data structure and replaces the pointer that readers will see. The original copy is maintained until the next context switch to ensure completion of all ongoing read operations. (Be aware that using RCU is more involved than using the primitives discussed thus far, and should be used only if you are sure that it’s the right tool for the job. There’s ample documentation in the kernel tree in Documentation/RCU/*.)
For an example on using RCU, look at fs/dcache.c. In Linux, each file is associated with directory entry information (stored in a structure called dentry), meta data information (stored in an inode), and actual data (stored in data blocks). Each time you operate on a file, the components in the file path are traversed and corresponding dentries are created. The dentries are kept cached in a data structure called the dcache to speed up future operations. At any time, the number of dcache lookups will be much more than dcache updates, so references to the dcache are protected using RCU primitives.

写的线程使用 write_seqlock () 和 write_sequnlock () 保护关键区域。
2.6 内核引入了另一个称为读拷贝更新的机制, 在读者远远超过作者的情况下, 可以提高性能。基本思想是, 读取器线程无需锁定即可执行。写线程更为复杂: 每一个都对数据结构的副本执行更新操作, 并替换读者将看到的指针。原始副本一直保持到下一上下文切换, 以确保所有正在进行的读取操作完成。(请注意, 使用RCU比使用上面讨论过的原语更复杂难懂, 只有当您确信它对你正在进行的任务是正确的工具才使用。内核在Documentation/RCU/*中有足够的文件对其说明。
举一个使用RCU的例子, 请查看 fs/dcache。在 Linux 中, 每个文件都与目录条目信息 (存储在称为 dentry 的结构中)、元数据信息 (存储在 inode 中) 和实际数据 (存储在数据块中) 相关联。每次对文件进行操作时, 都会遍历文件路径中的组件, 并创建相应的 dentries。dentries 被保存在一个称为 dcache 的数据结构中, 以加速未来的操作。在任何时候, dcache 查找的数量将远远超过 dcache 的更新, 因此对 dcache 的引用是使用协调单位原语进行保护的。

Debugging

Concurrency-related problems are generally hard to debug since they are usually difficult to reproduce. It’s a good idea to enable SMP (CONFIG_SMP) and preemption (CONFIG_PREEMPT) while compiling and testing your code, even if your production kernel is going to run on a UP machine with preemption disabled. There is a configuration option under Kernel Hacking called Spinlock Debugging (CONFIG_DEBUG_SPINLOCK) that can help you catch some common spinlock errors. Also, tools like lockmeter (http://oss.sgi.com/projects/lockmeter/) can be used to collect lock-related statistics.
The most common concurrency problem occurs when you forget to lock an access to a shared resource. This results in different threads “racing” through that access in an unregulated manner. The problem (called a race condition) may appear in the form of occasional strange code behavior.
Another potential problem arises when you miss releasing held locks in certain code paths, resulting in deadlocks. To get a hang of this, consider the following example:

并发相关的问题通常很难调试,因为它们通常很难重现。在编译和测试代码时启用 SMP (CONFIG_SMP) 和抢占 (CONFIG_PREEMPT) 是个好主意,即使你的生产环境内核运行在一个不可中断的单核机器。在内核里面有个叫Spinlock Debugging(CONFIG_DEBUG_SPINLOCK)的配置选项,这个可以帮助你发现一些常见的自旋锁的错误。当然,类似lockmeter(http://oss.sgi.com/projects/lockmeter/)的工具同样可以用来收集锁信息的信息。

当您忘记锁定对共享资源的访问时, 会发生最常见的并发问题。这种不常规的访问方式会导致不同的线程同步问题。这个问题(数据竞争情况)可能偶尔出现奇奇怪怪的代码行为

另一个潜在的问题是,当你忘记代码中忘记对获得的锁进行释放时,就会导致死锁的问题。为了理解这个,考虑下下面的例子:

1
2
3
4
5
6
7
8
9
10
11
12
13
14
15
/* Acquire lock */
spin_lock (&mylock);
/* ... Critical Section ... */
/* Assume that error is very rare
*
* I forgot to release the lock!
*/
if (error) {
return -EIO;
}
/* Release lock */
spin_unlock (&mylock);

After the occurrence of the error condition, any thread trying to acquire mylock gets deadlocked, and the kernel may freeze.
If the problem first manifests months or years after you write the code, it’s that much harder to go back and debug it. To avoid such unpleasant encounters, concurrency logic should be designed systematically at the beginning, when you architect your software.

在error条件判断出现的后面,任一尝试获取锁的线程都会死锁,系统可能会冻结住(死循环了)。如果问题首先体现在编写代码后的几个月或数年, 那么返回并调试它会更加困难。为了避免这种不愉快的遭遇, 在构建软件时, 应该在开始时系统地设计并发逻辑。

linux-thread

发表于 2017-10-10 | 分类于 linux-c

你是否知道进程和线程的关系?是否知道(user/kernel) space thread以及LWP之间的区别和关系。
以及操作系统如何调度它们的?

linux-cpu-core

发表于 2017-10-10 | 分类于 linux-c

计算机从单任务到多任务的发展也是对应的CPU的处理能力。现在的系统基本都是多核的系统并有着更高的系统吞吐能力。

平常只是脑海中有这些概念,并没有通过某些方法去论证这些东西。

在linux上面我们所有CPU相关的信息可以在/proc/cpuinfo文件里面可以看到,我们可以看到以下信息:

1
2
3
4
5
6
7
8
9
10
11
12
13
14
15
#查看CPU信息(型号)
[root@local ~]# cat /proc/cpuinfo | grep name | cut -f2 -d: | uniq -c
24 Intel(R) Xeon(R) CPU E5-2630 0 @ 2.30GHz
# 查看物理CPU个数
[root@local ~]# cat /proc/cpuinfo| grep "physical id"| sort| uniq| wc -l
2
# 查看每个物理CPU中core的个数(即核数)
[root@local ~]# cat /proc/cpuinfo| grep "cpu cores"| uniq
cpu cores : 6
# 查看逻辑CPU的个数
[root@local ~]# cat /proc/cpuinfo| grep "processor"| wc -l
24

以上各信息有如下关系:

1
2
CPU总核数 = 物理CPU个数 * 每颗物理CPU的核数
总逻辑CPU数 = 物理CPU个数 * 每颗物理CPU的核数 * 超线程数

从上面执行的结果来看,证明我使用的cpu有2 * 6 = 12核,每个核有2个超线程,所以有24个逻辑cpu。

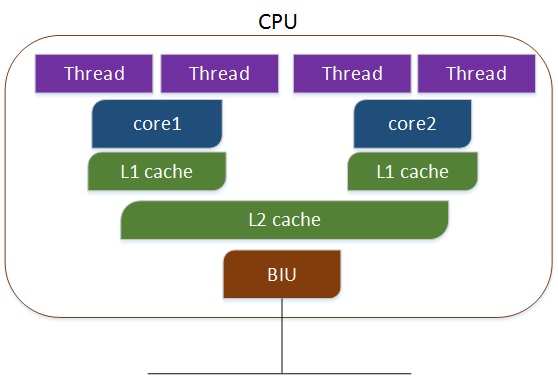
我们来看各CPU的架构

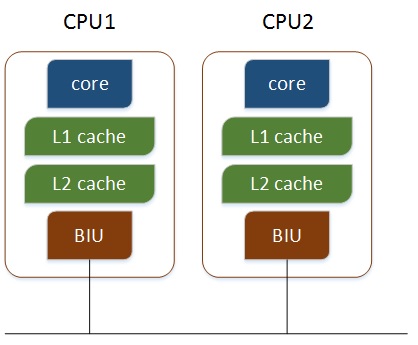
多个物理CPU,CPU通过总线进行通信,效率比较低,如下:

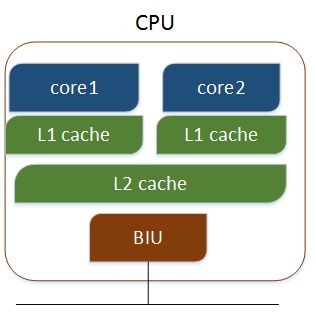
多核CPU,不同的核通过L2 cache进行通信,存储和外设通过总线与CPU通信,如下:*

多核超线程,每个核有两个逻辑的处理单元,两个核共同分享一个核的资源,如下:

参数

tcp/ip

发表于 2017-09-30 | 分类于 linux-c

概述

由于之前所学没有系统性的对网络这块的知识也没个详细学习过程,对于http、tcp/ip这些东西还只是停留在使用层面,但具体对系统是如何实现的原理无所适从。一个东西只要
弄清楚原理后,对这东西的使用就如刨丁解牛。

对一个东西的理解不能停留在表面,也不要感性的理解一个东西,我们需要看到一个东西
本质

我们平常生活中用电脑、手机很方便的上网或和它人聊天,这里就用到一些类似http、tcp等
技术实现,不同电脑或手机能识别其它设备发过来的东西要利益于互联网以及很早以前制订的
OSI模型。

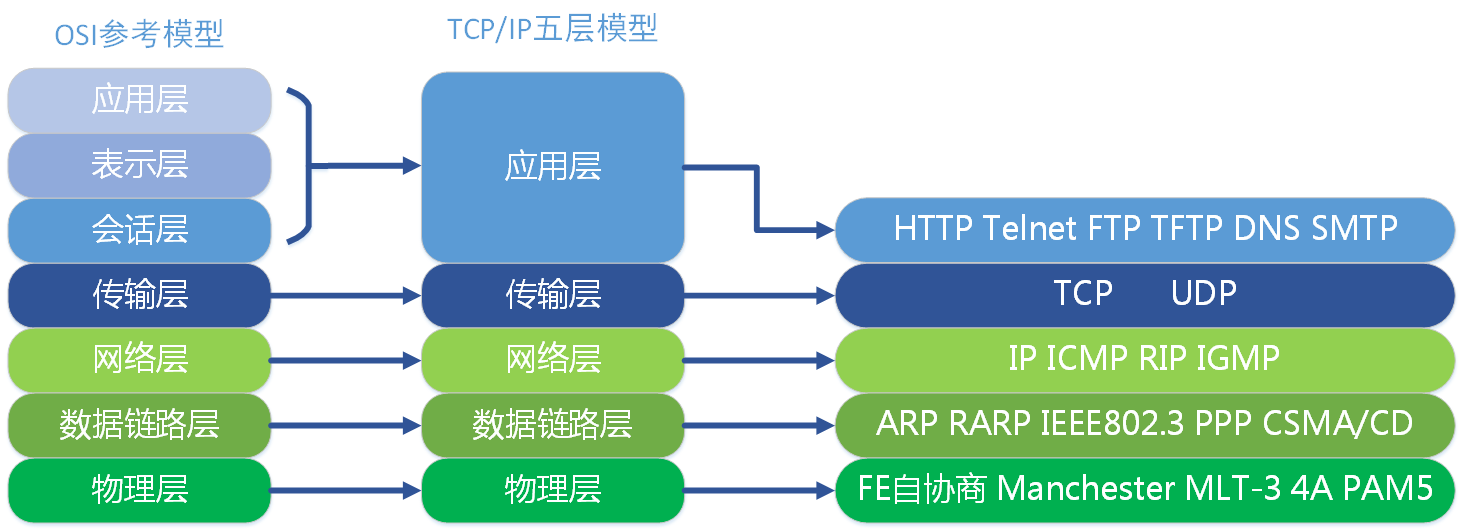
国际标准化组织ISO在1979年建立了一个分委员会来专门研究一种用于开放系统的体系结构,
提出了开放系统互连OSI模型,这是一个定义连接异种计算机的标准主体结构。

flow

flow

下面是自己根据现实实际情况非官方的语言版的理解:

  • 物理层
    相对于接收数据而言,是把发过来的信号转成机器识别的数据
    相对于发送数据来说,是把数据转化成信号在线路上传递。
    也就是说设备之间沟通的第一个媒介及其连接

  • 数据链路层

相对于维护网络中需要通信的一条路,用来传递数据,只是这个数据是以帧来定义

  • 网络层

这层标识了网络中两个实体的数据用的什么协议从哪里到哪里。

  • 传输层

数据的包的传送,保证消息的有序性,你抓包看到的seq ack等.我们平常用read读和写在这层

  • 会话层

也不知道怎么描述

  • 表示层

主要定义数据格式以及加密

  • 应用层

http、telnet等都是实现了应用层

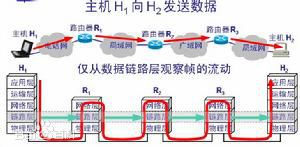
网络数据流向

一个网络数据包会经过多层路由器转发,所以下图是一个包从一个机器发出到达另外一台机器的示意图

flow

TCP简述

大家都知道tcp是一个面向连接的,可靠的,基于字节流的位于传输层的通信协议。

flow

flow

flow

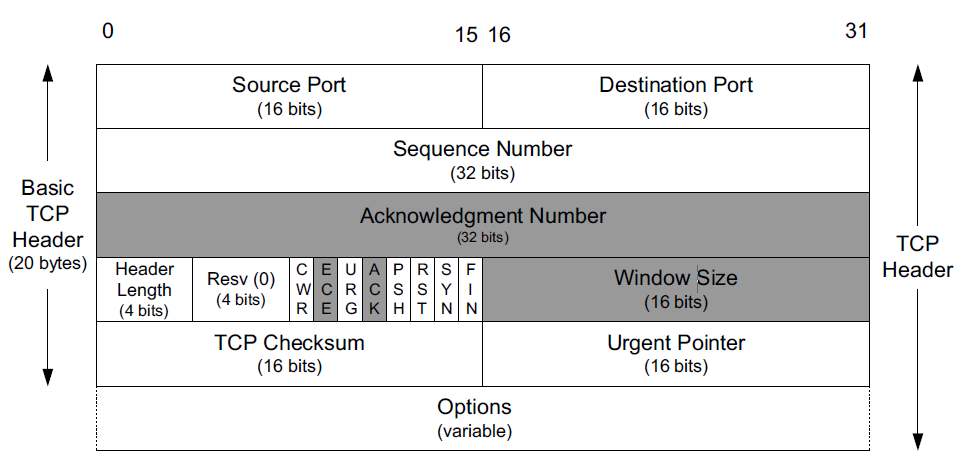
其中不携带选项的TCP头如下图所示(其中阴影部分的四个字段表示了相反方向的数据流信息),其中header length字段由4比特构成,最大为15,单位是32比特(32-bit word),即头长的最大值为15*32 bits = 60bytes,因此上面说携带选项的TCP头长最长为60bytes。

flow

根据上面的图,tcp_header以及tcpdump日志截图,我们可以知道内部的一些实现

上图中有几个字段需要重点介绍下:
(1)序号:Seq序号,占32位,用来标识从TCP源端向目的端发送的字节流,发起方发送数据时对此进行标记。
(2)确认序号:Ack序号,占32位,只有ACK标志位为1时,确认序号字段才有效,Ack=Seq+1。
(3)标志位:共6个,即URG、ACK、PSH、RST、SYN、FIN等,具体含义如下:
(A)URG:紧急指针(urgent pointer)有效。
(B)ACK:确认序号有效。
(C)PSH:接收方应该尽快将这个报文交给应用层。
(D)RST:重置连接。
(E)SYN:发起一个新连接。
(F)FIN:释放一个连接。

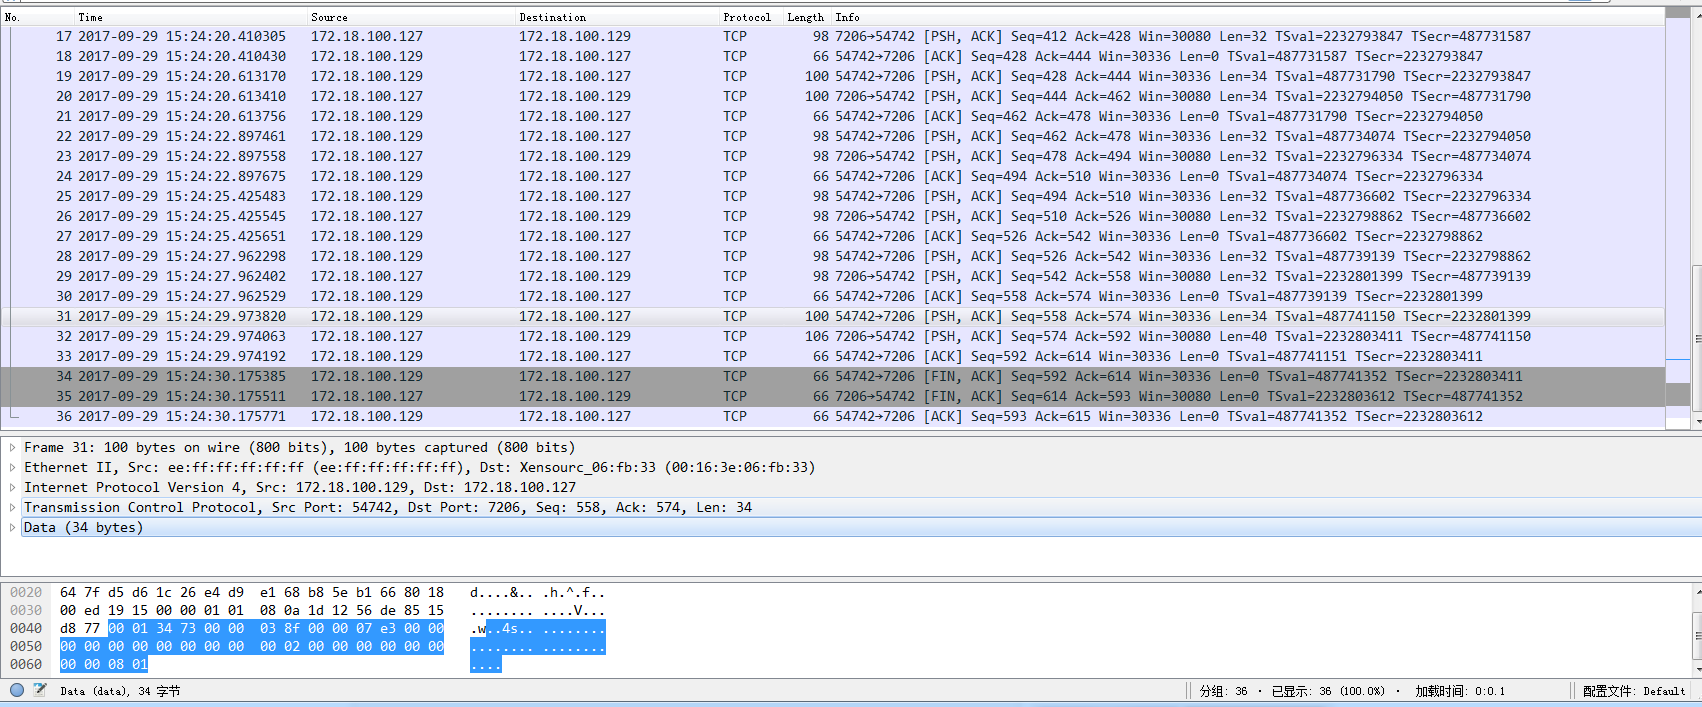
通过tcpdump日志的截图我们发现,回包的ACK都是发送方SEQ+1是告诉发送方你下次包的序号是ACK代码的

参考

部署脚本

发表于 2017-09-28 | 分类于 脚本

前言

开发工作做好后,我们经常要发布到其它的服务器上,外网的服务器配置是不一样。
所以我们把配置做成模版是有必要的,把需要变更部分用脚本把它替换掉。

有时间也学习python脚本,python脚本现在都成linux标配脚本了,这是一门很
强大的脚本语言。

既然现在用的markdown生成的html都不支持shell高亮,只支持bash

模版变量:

1
2
3
4
5
6
7
8
9
10
11
12
13
14
15
16
17
18
19
20
21
22
23
24
25
26
27
28
29
30
31
32
33
34
35
36
37
38
39
40
41
42
43
44
#!/bin/bash
# 这里的变量用于替换模版配置需要替换的值
#
# 游戏服ip
GAME_IP="127.0.0.1"
# 游戏服端口
GAME_PORT=":7206"
# 游戏服地址
GAME_HOST="${GAME_IP}${GAME_PORT}"
# 大厅IP地址(只有IP)
HALL_IP="127.0.0.1"
# 网关地址
GATEWAY_HOST="127.0.0.1:7208"
# 数据库连接
DB_HOST="postgres://postgres:qingyuan,123@192.168.1.1.123:5432/platform_test?sslmode=disable"
# redis服务器
REDIS_HOST="39.108.10.12:26310"
# redis密码
REDIS_PASSWD="af623spo"
# 七牛回放文件的存放目录
QINIU_DIR="playback_dev"
# 微信订单回调配置
NOTIFYURL="http://127.0.0.1:8090/paynotify"
# 统计服地址
ROUNDPATH="rank/rankRoundDev" #局数榜的7牛地址 默认为rank/rankRound
CHARGEPATH="rank/rankChargeDev" #充值榜的7牛地址 默认为rank/rankCharge
# 声明一个键值对数组
declare -A STR_ARR
STR_ARR=([DB_HOST]=${DB_HOST} [REDIS_HOST]=${REDIS_HOST} [REDIS_PASSWD]=${REDIS_PASSWD} \
[HALL_IP]=${HALL_IP} [GATEWAY_HOST]=${GATEWAY_HOST} [GAME_PORT]=${GAME_PORT} \
[GAME_HOST]=${GAME_HOST} [QINIU_DIR]=${QINIU_DIR} [NOTIFYURL]=${NOTIFYURL} \
[ROUNDPATH]=${ROUNDPATH} [CHARGEPATH]=${CHARGEPATH} )
for key in ${!STR_ARR[*]}
do
echo "${key} -----> ${STR_ARR[$key]}"
done

替换模版的脚本:

1
2
3
4
5
6
7
8
9
10
11
12
13
14
15
16
17
18
19
20
21
22
23
24
25
26
27
28
29
30
31
32
33
34
35
36
37
38
39
40
41
42
43
44
#!/bin/bash
CUR_DIR=$(dirname $(readlink -f $0))
# 用模版文件生成FILES里面的配置
COLOR_RED='\033[0;31m'
COLOR_GREEN='\033[0;32m'
COLOR_RESET='\033[0m'
if [ ! -f $CUR_DIR/public_conf.sh ]; then
echo -e "$COLOR_RED file $CUR_DIR/public_conf.sh not exit $COLOR_RESET"
exit 2
fi
source $CUR_DIR/public_conf.sh
read -p "请确认下是否正确,确认输入 yes : " var
if [ ! -n "$var" ] || [ "$var"x != "yes"x ] ; then
echo -e "$COLOR_RED 错误的输入:$var $COLOR_RESET"
exit 3
fi
FILES=(
config.toml \
)
function copyFile(){
file=$1
name=${file%%.*}
if [ ! -f "$CUR_DIR/$file" ]; then
cp -f "$CUR_DIR/${name}_template.toml" "$CUR_DIR/$file"
if [ $file == "config.toml" ]; then
for key in ${!STR_ARR[*]}
do
sed -i "s#${key}#${STR_ARR[$key]}#g" "$CUR_DIR/$file"
done
fi
fi
}
for file in ${FILES[*]} ; do
copyFile $file
done

malloc

发表于 2017-09-20 | 分类于 linux-c

内存管理转载

一直对linux内存管理比较的疑惑,所以在网上搜集资料,收藏下这篇。
原文


Hack the VM!


This is the fourth chapter in a series around virtual memory. The goal is to learn some CS basics, but in a different and more practical way.


If you missed the previous chapters, you should probably start there:


  • Chapter 0: Hack The Virtual Memory: C strings & /proc

  • Chapter 1: Hack The Virtual Memory: Python bytes

  • Chapter 2: Hack The Virtual Memory: Drawing the VM diagram


The heap


In this chapter we will look at the heap and malloc in order to answer some of the questions we ended with at the end of the previous chapter:


  • Why doesn’t our allocated memory start at the very beginning of the heap (0x2050010 vs 02050000)? What are those first 16 bytes used for?

  • Is the heap actually growing upwards?


Prerequisites


In order to fully understand this article, you will need to know:


  • The basics of the C programming language (especially pointers)

  • The very basics of the Linux filesystem and the shell

  • We will also use the /proc/[pid]/maps file (see man proc or read our first article Hack The Virtual Memory, chapter 0: C strings & /proc)


Environment


All scripts and programs have been tested on the following system:


  • Ubuntu

    • Linux ubuntu 4.4.0-31-generic #50~14.04.1-Ubuntu SMP Wed Jul 13 01:07:32 UTC 2016 x86_64 x86_64 x86_64 GNU/Linux


Tools used:


  • gcc

    • gcc (Ubuntu 4.8.4-2ubuntu1~14.04.3) 4.8.4


  • glibc 2.19 (see version.c if you need to check your glibc version)

  • strace

    • strace — version 4.8


Everything we will write will be true for this system/environment, but may be different on another system


We will also go through the Linux source code. If you are on Ubuntu, you can download the sources of your current kernel by running this command:


apt-get source linux-image-$(uname -r)

malloc


malloc is the common function used to dynamically allocate memory. This memory is allocated on the “heap”.

Note: malloc is not a system call.


From man malloc:


[…] allocate dynamic memory[…]
void malloc(size_t size);
[…]
The malloc() function allocates size bytes and returns a pointer to the allocated memory.

No malloc, no [heap]


Let’s look at memory regions of a process that does not call malloc (0-main.c).


#include ;
#include ;

/** main - do nothing
Return: EXIT_FAILURE if something failed. Otherwise EXIT_SUCCESS
/
int main(void)
{
getchar();
return (EXIT_SUCCESS);
}


julien@holberton:~/holberton/w/hackthevm3$ gcc -Wall -Wextra -pedantic -Werror 0-main.c -o 0
julien@holberton:~/holberton/w/hackthevm3$ ./0


Quick reminder (1/3): the memory regions of a process are listed in the /proc/[pid]/maps file. As a result, we first need to know the PID of the process. That is done using the ps command; the second column of ps aux output will give us the PID of the process. Please read chapter 0 to learn more.


julien@holberton:/tmp$ ps aux | grep \ ./0$
julien 3638 0.0 0.0 4200 648 pts/9 S+ 12:01 0:00 ./0

Quick reminder (2/3): from the above output, we can see that the PID of the process we want to look at is 3638. As a result, the maps file will be found in the directory /proc/3638.


julien@holberton:/tmp$ cd /proc/3638

Quick reminder (3/3): The maps file contains the memory regions of the process. The format of each line in this file is:

address perms offset dev inode pathname


julien@holberton:/proc/3638$ cat maps
00400000-00401000 r-xp 00000000 08:01 174583 /home/julien/holberton/w/hack_the_virtual_memory/03. The Heap/0
00600000-00601000 r–p 00000000 08:01 174583 /home/julien/holberton/w/hack_the_virtual_memory/03. The Heap/0
00601000-00602000 rw-p 00001000 08:01 174583 /home/julien/holberton/w/hack_the_virtual_memory/03. The Heap/0
7f38f87d7000-7f38f8991000 r-xp 00000000 08:01 136253 /lib/x86_64-linux-gnu/libc-2.19.so
7f38f8991000-7f38f8b91000 —p 001ba000 08:01 136253 /lib/x86_64-linux-gnu/libc-2.19.so
7f38f8b91000-7f38f8b95000 r–p 001ba000 08:01 136253 /lib/x86_64-linux-gnu/libc-2.19.so
7f38f8b95000-7f38f8b97000 rw-p 001be000 08:01 136253 /lib/x86_64-linux-gnu/libc-2.19.so
7f38f8b97000-7f38f8b9c000 rw-p 00000000 00:00 0
7f38f8b9c000-7f38f8bbf000 r-xp 00000000 08:01 136229 /lib/x86_64-linux-gnu/ld-2.19.so
7f38f8da3000-7f38f8da6000 rw-p 00000000 00:00 0
7f38f8dbb000-7f38f8dbe000 rw-p 00000000 00:00 0
7f38f8dbe000-7f38f8dbf000 r–p 00022000 08:01 136229 /lib/x86_64-linux-gnu/ld-2.19.so
7f38f8dbf000-7f38f8dc0000 rw-p 00023000 08:01 136229 /lib/x86_64-linux-gnu/ld-2.19.so
7f38f8dc0000-7f38f8dc1000 rw-p 00000000 00:00 0
7ffdd85c5000-7ffdd85e6000 rw-p 00000000 00:00 0 [stack]
7ffdd85f2000-7ffdd85f4000 r–p 00000000 00:00 0 [vvar]
7ffdd85f4000-7ffdd85f6000 r-xp 00000000 00:00 0 [vdso]
ffffffffff600000-ffffffffff601000 r-xp 00000000 00:00 0 [vsyscall]
julien@holberton:/proc/3638$

Note: hackthevm3 is a symbolic link to hack_the_virtual_memory/03. The Heap/


->; As we can see from the above maps file, there’s no [heap] region allocated.


malloc(x)


Let’s do the same but with a program that calls malloc (1-main.c):


#include ;
#include ;

/** main - 1 call to malloc
Return: EXIT_FAILURE if something failed. Otherwise EXIT_SUCCESS
/
int main(void)
{
malloc(1);
getchar();
return (EXIT_SUCCESS);
}

julien@holberton:~/holberton/w/hackthevm3$ gcc -Wall -Wextra -pedantic -Werror 1-main.c -o 1
julien@holberton:~/holberton/w/hackthevm3$ ./1


julien@holberton:/proc/3638$ ps aux | grep \ ./1$
julien 3718 0.0 0.0 4332 660 pts/9 S+ 12:09 0:00 ./1
julien@holberton:/proc/3638$ cd /proc/3718
julien@holberton:/proc/3718$ cat maps
00400000-00401000 r-xp 00000000 08:01 176964 /home/julien/holberton/w/hack_the_virtual_memory/03. The Heap/1
00600000-00601000 r–p 00000000 08:01 176964 /home/julien/holberton/w/hack_the_virtual_memory/03. The Heap/1
00601000-00602000 rw-p 00001000 08:01 176964 /home/julien/holberton/w/hack_the_virtual_memory/03. The Heap/1
01195000-011b6000 rw-p 00000000 00:00 0 [heap]
…
julien@holberton:/proc/3718$

->; the [heap] is here.


Let’s check the return value of malloc to make sure the returned address is in the heap region (2-main.c):


#include ;
#include ;

/** main - prints the malloc returned address
Return: EXIT_FAILURE if something failed. Otherwise EXIT_SUCCESS
/
int main(void)
{
void
p;

p = malloc(1);
printf(“%p\n”, p);
getchar();
return (EXIT_SUCCESS);
}

julien@holberton:~/holberton/w/hackthevm3$ gcc -Wall -Wextra -pedantic -Werror 2-main.c -o 2
julien@holberton:~/holberton/w/hackthevm3$ ./2
0x24d6010


julien@holberton:/proc/3718$ ps aux | grep \ ./2$
julien 3834 0.0 0.0 4336 676 pts/9 S+ 12:48 0:00 ./2
julien@holberton:/proc/3718$ cd /proc/3834
julien@holberton:/proc/3834$ cat maps
00400000-00401000 r-xp 00000000 08:01 176966 /home/julien/holberton/w/hack_the_virtual_memory/03. The Heap/2
00600000-00601000 r–p 00000000 08:01 176966 /home/julien/holberton/w/hack_the_virtual_memory/03. The Heap/2
00601000-00602000 rw-p 00001000 08:01 176966 /home/julien/holberton/w/hack_the_virtual_memory/03. The Heap/2
024d6000-024f7000 rw-p 00000000 00:00 0 [heap]
…
julien@holberton:/proc/3834$

->; 024d6000 <0x24d6010 < 024f7000


The returned address is inside the heap region. And as we have seen in the previous chapter, the returned address does not start exactly at the beginning of the region; we’ll see why later.


strace, brk and sbrk


malloc is a “regular” function (as opposed to a system call), so it must call some kind of syscall in order to manipulate the heap. Let’s use strace to find out.


strace is a program used to trace system calls and signals. Any program will always use a few syscalls before your main function is executed. In order to know which syscalls are used by malloc, we will add a write syscall before and after the call to malloc(3-main.c).


#include ;
#include ;
#include ;

/
main - let’s find out which syscall malloc is using
Return: EXIT_FAILURE if something failed. Otherwise EXIT_SUCCESS /
int main(void)
{
void p;

write(1, “BEFORE MALLOC\n”, 14);
p = malloc(1);
write(1, “AFTER MALLOC\n”, 13);
printf(“%p\n”, p);
getchar();
return (EXIT_SUCCESS);
}

julien@holberton:~/holberton/w/hackthevm3$ gcc -Wall -Wextra -pedantic -Werror 3-main.c -o 3
julien@holberton:~/holberton/w/hackthevm3$ strace ./3
execve(“./3”, [“./3”], [/ 61 vars /]) = 0
…
write(1, “BEFORE MALLOC\n”, 14BEFORE MALLOC
) = 14
brk(0) = 0xe70000
brk(0xe91000) = 0xe91000
write(1, “AFTER MALLOC\n”, 13AFTER MALLOC
) = 13
…
read(0,

From the above listing we can focus on this:


brk(0)                                  = 0xe70000
brk(0xe91000) = 0xe91000

->; malloc is using the brk system call in order to manipulate the heap. From brk man page (man brk), we can see what this system call is doing:


…
int brk(void addr);
void *sbrk(intptr_t increment);
…
DESCRIPTION
brk() and sbrk() change the location of the program break, which defines
the end of the process’s data segment (i.e., the program break is the first
location after the end of the uninitialized data segment). Increasing the
program break has the effect of allocating memory to the process; decreas‐
ing the break deallocates memory.

brk() sets the end of the data segment to the value specified by addr, when
that value is reasonable, the system has enough memory, and the process
does not exceed its maximum data size (see setrlimit(2)).

sbrk() increments the program’s data space by increment bytes. Calling
sbrk() with an increment of 0 can be used to find the current location of
the program break.

The program break is the address of the first location beyond the current end of the data region of the program in the virual memory.


program break before the call to malloc / brk


By increasing the value of the program break, via brk or sbrk, the function malloc creates a new space that can then be used by the process to dynamically allocate memory (using malloc).


program break after the malloc / brk call


So the heap is actually an extension of the data segment of the program.


The first call to brk (brk(0)) returns the current address of the program break to malloc. And the second call is the one that actually creates new memory (since 0xe91000 >; 0xe70000) by increasing the value of the program break. In the above example, the heap is now starting at 0xe70000 and ends at 0xe91000. Let’s double check with the /proc/[PID]/maps file:


julien@holberton:/proc/3855$ ps aux | grep \ ./3$
julien 4011 0.0 0.0 4748 708 pts/9 S+ 13:04 0:00 strace ./3
julien 4014 0.0 0.0 4336 644 pts/9 S+ 13:04 0:00 ./3
julien@holberton:/proc/3855$ cd /proc/4014
julien@holberton:/proc/4014$ cat maps
00400000-00401000 r-xp 00000000 08:01 176967 /home/julien/holberton/w/hack_the_virtual_memory/03. The Heap/3
00600000-00601000 r–p 00000000 08:01 176967 /home/julien/holberton/w/hack_the_virtual_memory/03. The Heap/3
00601000-00602000 rw-p 00001000 08:01 176967 /home/julien/holberton/w/hack_the_virtual_memory/03. The Heap/3
00e70000-00e91000 rw-p 00000000 00:00 0 [heap]
…
julien@holberton:/proc/4014$

->; 00e70000-00e91000 rw-p 00000000 00:00 0 [heap] matches the pointers returned back to malloc by brk.


That’s great, but wait, why didmalloc increment the heap by 00e91000 – 00e70000 = 0x21000 or 135168 bytes, when we only asked for only 1 byte?


Many mallocs


What will happen if we call malloc several times? (4-main.c)


#include ;
#include ;
#include ;

/
main - many calls to malloc
Return: EXIT_FAILURE if something failed. Otherwise EXIT_SUCCESS /
int main(void)
{
void p;

write(1, “BEFORE MALLOC #0\n”, 17);
p = malloc(1024);
write(1, “AFTER MALLOC #0\n”, 16);
printf(“%p\n”, p);

write(1, “BEFORE MALLOC #1\n”, 17);
p = malloc(1024);
write(1, “AFTER MALLOC #1\n”, 16);
printf(“%p\n”, p);

write(1, “BEFORE MALLOC #2\n”, 17);
p = malloc(1024);
write(1, “AFTER MALLOC #2\n”, 16);
printf(“%p\n”, p);

write(1, “BEFORE MALLOC #3\n”, 17);
p = malloc(1024);
write(1, “AFTER MALLOC #3\n”, 16);
printf(“%p\n”, p);

getchar();
return (EXIT_SUCCESS);
}

julien@holberton:~/holberton/w/hackthevm3$ gcc -Wall -Wextra -pedantic -Werror 4-main.c -o 4
julien@holberton:~/holberton/w/hackthevm3$ strace ./4
execve(“./4”, [“./4”], [/ 61 vars /]) = 0
…
write(1, “BEFORE MALLOC #0\n”, 17BEFORE MALLOC #0
) = 17
brk(0) = 0x1314000
brk(0x1335000) = 0x1335000
write(1, “AFTER MALLOC #0\n”, 16AFTER MALLOC #0
) = 16
…
write(1, “0x1314010\n”, 100x1314010
) = 10
write(1, “BEFORE MALLOC #1\n”, 17BEFORE MALLOC #1
) = 17
write(1, “AFTER MALLOC #1\n”, 16AFTER MALLOC #1
) = 16
write(1, “0x1314420\n”, 100x1314420
) = 10
write(1, “BEFORE MALLOC #2\n”, 17BEFORE MALLOC #2
) = 17
write(1, “AFTER MALLOC #2\n”, 16AFTER MALLOC #2
) = 16
write(1, “0x1314830\n”, 100x1314830
) = 10
write(1, “BEFORE MALLOC #3\n”, 17BEFORE MALLOC #3
) = 17
write(1, “AFTER MALLOC #3\n”, 16AFTER MALLOC #3
) = 16
write(1, “0x1314c40\n”, 100x1314c40
) = 10
…
read(0,

->; malloc is NOT calling brk each time we call it.


The first time, malloc creates a new space (the heap) for the program (by increasing the program break location). The following times, malloc uses the same space to give our program “new” chunks of memory. Those “new” chunks of memory are part of the memory previously allocated using brk. This way, malloc doesn’t have to use syscalls (brk) every time we call it, and thus it makes malloc – and our programs using malloc – faster. It also allows malloc and free to optimize the usage of the memory.


Let’s double check that we have only one heap, allocated by the first call to brk:


julien@holberton:/proc/4014$ ps aux | grep \ ./4$
julien 4169 0.0 0.0 4748 688 pts/9 S+ 13:33 0:00 strace ./4
julien 4172 0.0 0.0 4336 656 pts/9 S+ 13:33 0:00 ./4
julien@holberton:/proc/4014$ cd /proc/4172
julien@holberton:/proc/4172$ cat maps
00400000-00401000 r-xp 00000000 08:01 176973 /home/julien/holberton/w/hack_the_virtual_memory/03. The Heap/4
00600000-00601000 r–p 00000000 08:01 176973 /home/julien/holberton/w/hack_the_virtual_memory/03. The Heap/4
00601000-00602000 rw-p 00001000 08:01 176973 /home/julien/holberton/w/hack_the_virtual_memory/03. The Heap/4
01314000-01335000 rw-p 00000000 00:00 0 [heap]
7f4a3f2c4000-7f4a3f47e000 r-xp 00000000 08:01 136253 /lib/x86_64-linux-gnu/libc-2.19.so
7f4a3f47e000-7f4a3f67e000 —p 001ba000 08:01 136253 /lib/x86_64-linux-gnu/libc-2.19.so
7f4a3f67e000-7f4a3f682000 r–p 001ba000 08:01 136253 /lib/x86_64-linux-gnu/libc-2.19.so
7f4a3f682000-7f4a3f684000 rw-p 001be000 08:01 136253 /lib/x86_64-linux-gnu/libc-2.19.so
7f4a3f684000-7f4a3f689000 rw-p 00000000 00:00 0
7f4a3f689000-7f4a3f6ac000 r-xp 00000000 08:01 136229 /lib/x86_64-linux-gnu/ld-2.19.so
7f4a3f890000-7f4a3f893000 rw-p 00000000 00:00 0
7f4a3f8a7000-7f4a3f8ab000 rw-p 00000000 00:00 0
7f4a3f8ab000-7f4a3f8ac000 r–p 00022000 08:01 136229 /lib/x86_64-linux-gnu/ld-2.19.so
7f4a3f8ac000-7f4a3f8ad000 rw-p 00023000 08:01 136229 /lib/x86_64-linux-gnu/ld-2.19.so
7f4a3f8ad000-7f4a3f8ae000 rw-p 00000000 00:00 0
7ffd1ba73000-7ffd1ba94000 rw-p 00000000 00:00 0 [stack]
7ffd1bbed000-7ffd1bbef000 r–p 00000000 00:00 0 [vvar]
7ffd1bbef000-7ffd1bbf1000 r-xp 00000000 00:00 0 [vdso]
ffffffffff600000-ffffffffff601000 r-xp 00000000 00:00 0 [vsyscall]
julien@holberton:/proc/4172$

->; We have only one [heap] and the addresses match those returned by sbrk: 0x1314000 & 0x1335000


Naive malloc


Based on the above, and assuming we won’t ever need to free anything, we can now write our own (naive) version of malloc, that would move the program break each time it is called.


#include ;
#include ;

/** malloc - naive version of malloc: dynamically allocates memory on the heap using sbrk
@size: number of bytes to allocate
Return: the memory address newly allocated, or NULL on error
Note: don’t do this at home :) /
void malloc(size_t size)
{
void
previous_break;

previous_break = sbrk(size);
/ check for error /
if (previous_break == (void ) -1)
{
/
on error malloc returns NULL /
return (NULL);
}
return (previous_break);
}

The 0x10 lost bytes


If we look at the output of the previous program (4-main.c), we can see that the first memory address returned by malloc doesn’t start at the beginning of the heap, but 0x10 bytes after: 0x1314010 vs 0x1314000. Also, when we call malloc(1024) a second time, the address should be 0x1314010 (the returned value of the first call to malloc) + 1024 (or 0x400 in hexadecimal, since the first call to malloc was asking for 1024 bytes) = 0x1318010. But the return value of the second call to malloc is 0x1314420. We have lost 0x10 bytes again! Same goes for the subsequent calls.


Let’s look at what we can find inside those “lost” 0x10-byte memory spaces (5-main.c) and whether the memory loss stays constant:


#include ;
#include ;
#include ;

/** pmem - print mem
@p: memory address to start printing from @bytes: number of bytes to print
Return: nothing
/
void pmem(void
p, unsigned int bytes)
{
unsigned char ptr;
unsigned int i;

ptr = (unsigned char
)p;
for (i = 0; i < bytes; i++)
{
if (i != 0)
{
printf(“ “);
}
printf(“%02x”, (ptr + i));
}
printf(“\n”);
}

/**
main - the 0x10 lost bytes
Return: EXIT_FAILURE if something failed. Otherwise EXIT_SUCCESS
/
int main(void)
{
void
p;
int i;

for (i = 0; i < 10; i++)
{
p = malloc(1024 (i + 1));
printf(“%p\n”, p);
printf(“bytes at %p:\n”, (void
)((char )p - 0x10));
pmem((char
)p - 0x10, 0x10);
}
return (EXIT_SUCCESS);
}

julien@holberton:~/holberton/w/hackthevm3$ gcc -Wall -Wextra -pedantic -Werror 5-main.c -o 5
julien@holberton:~/holberton/w/hackthevm3$ ./5
0x1fa8010
bytes at 0x1fa8000:
00 00 00 00 00 00 00 00 11 04 00 00 00 00 00 00
0x1fa8420
bytes at 0x1fa8410:
00 00 00 00 00 00 00 00 11 08 00 00 00 00 00 00
0x1fa8c30
bytes at 0x1fa8c20:
00 00 00 00 00 00 00 00 11 0c 00 00 00 00 00 00
0x1fa9840
bytes at 0x1fa9830:
00 00 00 00 00 00 00 00 11 10 00 00 00 00 00 00
0x1faa850
bytes at 0x1faa840:
00 00 00 00 00 00 00 00 11 14 00 00 00 00 00 00
0x1fabc60
bytes at 0x1fabc50:
00 00 00 00 00 00 00 00 11 18 00 00 00 00 00 00
0x1fad470
bytes at 0x1fad460:
00 00 00 00 00 00 00 00 11 1c 00 00 00 00 00 00
0x1faf080
bytes at 0x1faf070:
00 00 00 00 00 00 00 00 11 20 00 00 00 00 00 00
0x1fb1090
bytes at 0x1fb1080:
00 00 00 00 00 00 00 00 11 24 00 00 00 00 00 00
0x1fb34a0
bytes at 0x1fb3490:
00 00 00 00 00 00 00 00 11 28 00 00 00 00 00 00
julien@holberton:~/holberton/w/hackthevm3$

There is one clear pattern: the size of the malloc’ed memory chunk is always found in the preceding 0x10 bytes. For instance, the first malloc call is malloc’ing 1024 (0x0400) bytes and we can find 11 04 00 00 00 00 00 00 in the preceding 0x10 bytes. Those last bytes represent the number 0x 00 00 00 00 00 00 04 11 = 0x400 (1024) + 0x10 (the block size preceding those 1024 bytes + 1 (we’ll talk about this “+1” later in this chapter). If we look at each 0x10 bytes preceding the addresses returned by malloc, they all contain the size of the chunk of memory asked to malloc + 0x10 + 1.


At this point, given what we said and saw earlier, we can probably guess that those 0x10 bytes are a sort of data structure used by malloc (and free) to deal with the heap. And indeed, even though we don’t understand everything yet, we can already use this data structure to go from one malloc’ed chunk of memory to the other (6-main.c) as long as we have the address of the beginning of the heap (and as long as we have never called free):


#include ;
#include ;
#include ;

/
pmem - print mem @p: memory address to start printing from
@bytes: number of bytes to print
Return: nothing /
void pmem(void p, unsigned int bytes)
{
unsigned char
ptr;
unsigned int i;

ptr = (unsigned char )p;
for (i = 0; i < bytes; i++)
{
if (i != 0)
{
printf(“ “);
}
printf(“%02x”,
(ptr + i));
}
printf(“\n”);
}

/

main - using the 0x10 bytes to jump to next malloc’ed chunks
Return: EXIT_FAILURE if something failed. Otherwise EXIT_SUCCESS /
int main(void)
{
void p;
int i;
void
heap_start;
size_t size_of_the_block;

heap_start = sbrk(0);
write(1, “START\n”, 6);
for (i = 0; i < 10; i++)
{
p = malloc(1024 (i + 1)); ((int )p) = i;
printf(“%p: [%i]\n”, p, i);
}
p = heap_start;
for (i = 0; i < 10; i++)
{
pmem(p, 0x10);
size_of_the_block =
((size_t )((char )p + 8)) - 1;
printf(“%p: [%i] - size = %lu\n”,
(void )((char )p + 0x10),
((int )((char )p + 0x10)),
size_of_the_block);
p = (void
)((char )p + size_of_the_block);
}
write(1, “END\n”, 4);
return (EXIT_SUCCESS);
}

julien@holberton:~/holberton/w/hackthevm3$ gcc -Wall -Wextra -pedantic -Werror 6-main.c -o 6
julien@holberton:~/holberton/w/hackthevm3$ ./6
START
0x9e6010: [0]
0x9e6420: [1]
0x9e6c30: [2]
0x9e7840: [3]
0x9e8850: [4]
0x9e9c60: [5]
0x9eb470: [6]
0x9ed080: [7]
0x9ef090: [8]
0x9f14a0: [9]
00 00 00 00 00 00 00 00 11 04 00 00 00 00 00 00
0x9e6010: [0] - size = 1040
00 00 00 00 00 00 00 00 11 08 00 00 00 00 00 00
0x9e6420: [1] - size = 2064
00 00 00 00 00 00 00 00 11 0c 00 00 00 00 00 00
0x9e6c30: [2] - size = 3088
00 00 00 00 00 00 00 00 11 10 00 00 00 00 00 00
0x9e7840: [3] - size = 4112
00 00 00 00 00 00 00 00 11 14 00 00 00 00 00 00
0x9e8850: [4] - size = 5136
00 00 00 00 00 00 00 00 11 18 00 00 00 00 00 00
0x9e9c60: [5] - size = 6160
00 00 00 00 00 00 00 00 11 1c 00 00 00 00 00 00
0x9eb470: [6] - size = 7184
00 00 00 00 00 00 00 00 11 20 00 00 00 00 00 00
0x9ed080: [7] - size = 8208
00 00 00 00 00 00 00 00 11 24 00 00 00 00 00 00
0x9ef090: [8] - size = 9232
00 00 00 00 00 00 00 00 11 28 00 00 00 00 00 00
0x9f14a0: [9] - size = 10256
END
julien@holberton:~/holberton/w/hackthevm3$

One of our open questions from the previous chapter is now answered: malloc is using 0x10 additional bytes for each malloc’ed memory block to store the size of the block.


0x10 bytes preceeding malloc


This data will actually be used by free to save it to a list of available blocks for future calls to malloc.


But our study also raises a new question: what are the first 8 bytes of the 16 (0x10 in hexadecimal) bytes used for? It seems to always be zero. Is it just padding?


RTFSC


At this stage, we probably want to check the source code of malloc to confirm what we just found (malloc.c from the glibc).


1
2
3
4
5
6
7
8
9
10
11
12
13
14
15
16
17
18
19
20
21
22
23
24
25
26
27
28
29
30
31
32
33
34
35
36
37
38
39
40
41
42
43
44
45
46
47
48
49
50
51
52
53
54
55
56
57
58
59
60
61
62
63
64
65
66
67
68
69
70
71
72
73
74
75
76
77
78
79
80
81
82
83
84
85
86
87
88
89
90
91
92
93
94
95
96
97
98
99
100
101
102
103
104
105
1055 /*
1056 malloc_chunk details:
1057
1058 (The following includes lightly edited explanations by Colin Plumb.)
1059
1060 Chunks of memory are maintained using a `boundary tag' method as
1061 described in e.g., Knuth or Standish. (See the paper by Paul
1062 Wilson ftp://ftp.cs.utexas.edu/pub/garbage/allocsrv.ps for a
1063 survey of such techniques.) Sizes of free chunks are stored both
1064 in the front of each chunk and at the end. This makes
1065 consolidating fragmented chunks into bigger chunks very fast. The
1066 size fields also hold bits representing whether chunks are free or
1067 in use.
1068
1069 An allocated chunk looks like this:
1070
1071
1072 chunk->; +-+-+-+-+-+-+-+-+-+-+-+-+-+-+-+-+-+-+-+-+-+-+-+-+-+-+-+-+-+-+-+-+
1073 | Size of previous chunk, if unallocated (P clear) |
1074 +-+-+-+-+-+-+-+-+-+-+-+-+-+-+-+-+-+-+-+-+-+-+-+-+-+-+-+-+-+-+-+-+
1075 | Size of chunk, in bytes |A|M|P|
1076 mem->; +-+-+-+-+-+-+-+-+-+-+-+-+-+-+-+-+-+-+-+-+-+-+-+-+-+-+-+-+-+-+-+-+
1077 | User data starts here... .
1078 . .
1079 . (malloc_usable_size() bytes) .
1080 . |
1081 nextchunk->; +-+-+-+-+-+-+-+-+-+-+-+-+-+-+-+-+-+-+-+-+-+-+-+-+-+-+-+-+-+-+-+-+
1082 | (size of chunk, but used for application data) |
1083 +-+-+-+-+-+-+-+-+-+-+-+-+-+-+-+-+-+-+-+-+-+-+-+-+-+-+-+-+-+-+-+-+
1084 | Size of next chunk, in bytes |A|0|1|
1085 +-+-+-+-+-+-+-+-+-+-+-+-+-+-+-+-+-+-+-+-+-+-+-+-+-+-+-+-+-+-+-+-+
1086
1087 Where "chunk" is the front of the chunk for the purpose of most of
1088 the malloc code, but "mem" is the pointer that is returned to the
1089 user. "Nextchunk" is the beginning of the next contiguous chunk.
```</pre>
<p>->; We were correct \o/. Right before the address returned by <code>malloc</code> to the user, we have two variables:</p>
<ul>
<li>Size of previous chunk, if unallocated: we never free’d any chunks so that is why it was always 0</li>
<li>Size of chunk, in bytes</li>
</ul>
<p>Let’s free some chunks to confirm that the first 8 bytes are used the way the source code describes it (<code>7-main.c</code>):</p>
<pre>
```C
#include <stdio.h>;
#include <stdlib.h>;
#include <unistd.h>;
/**
* pmem - print mem
* @p: memory address to start printing from
* @bytes: number of bytes to print
*
* Return: nothing
*/
void pmem(void *p, unsigned int bytes)
{
unsigned char *ptr;
unsigned int i;
ptr = (unsigned char *)p;
for (i = 0; i < bytes; i++)
{
if (i != 0)
{
printf(" ");
}
printf("%02x", *(ptr + i));
}
printf("\n");
}
/**
* main - confirm the source code
*
* Return: EXIT_FAILURE if something failed. Otherwise EXIT_SUCCESS
*/
int main(void)
{
void *p;
int i;
size_t size_of_the_chunk;
size_t size_of_the_previous_chunk;
void *chunks[10];
for (i = 0; i < 10; i++)
{
p = malloc(1024 * (i + 1));
chunks[i] = (void *)((char *)p - 0x10);
printf("%p\n", p);
}
free((char *)(chunks[3]) + 0x10);
free((char *)(chunks[7]) + 0x10);
for (i = 0; i < 10; i++)
{
p = chunks[i];
printf("chunks[%d]: ", i);
pmem(p, 0x10);
size_of_the_chunk = *((size_t *)((char *)p + 8)) - 1;
size_of_the_previous_chunk = *((size_t *)((char *)p));
printf("chunks[%d]: %p, size = %li, prev = %li\n",
i, p, size_of_the_chunk, size_of_the_previous_chunk);
}
return (EXIT_SUCCESS);
}


julien@holberton:~/holberton/w/hackthevm3$ gcc -Wall -Wextra -pedantic -Werror 7-main.c -o 7
julien@holberton:~/holberton/w/hackthevm3$ ./7
0x1536010
0x1536420
0x1536c30
0x1537840
0x1538850
0x1539c60
0x153b470
0x153d080
0x153f090
0x15414a0
chunks[0]: 00 00 00 00 00 00 00 00 11 04 00 00 00 00 00 00
chunks[0]: 0x1536000, size = 1040, prev = 0
chunks[1]: 00 00 00 00 00 00 00 00 11 08 00 00 00 00 00 00
chunks[1]: 0x1536410, size = 2064, prev = 0
chunks[2]: 00 00 00 00 00 00 00 00 11 0c 00 00 00 00 00 00
chunks[2]: 0x1536c20, size = 3088, prev = 0
chunks[3]: 00 00 00 00 00 00 00 00 11 10 00 00 00 00 00 00
chunks[3]: 0x1537830, size = 4112, prev = 0
chunks[4]: 10 10 00 00 00 00 00 00 10 14 00 00 00 00 00 00
chunks[4]: 0x1538840, size = 5135, prev = 4112
chunks[5]: 00 00 00 00 00 00 00 00 11 18 00 00 00 00 00 00
chunks[5]: 0x1539c50, size = 6160, prev = 0
chunks[6]: 00 00 00 00 00 00 00 00 11 1c 00 00 00 00 00 00
chunks[6]: 0x153b460, size = 7184, prev = 0
chunks[7]: 00 00 00 00 00 00 00 00 11 20 00 00 00 00 00 00
chunks[7]: 0x153d070, size = 8208, prev = 0
chunks[8]: 10 20 00 00 00 00 00 00 10 24 00 00 00 00 00 00
chunks[8]: 0x153f080, size = 9231, prev = 8208
chunks[9]: 00 00 00 00 00 00 00 00 11 28 00 00 00 00 00 00
chunks[9]: 0x1541490, size = 10256, prev = 0
julien@holberton:~/holberton/w/hackthevm3$

As we can see from the above listing, when the previous chunk has been free’d, the malloc chunk’s first 8 bytes contain the size of the previous unallocated chunk. So the correct representation of a malloc chunk is the following:


malloc chunk


Also, it seems that the first bit of the next 8 bytes (containing the size of the current chunk) serves as a flag to check if the previous chunk is used (1) or not (0). So the correct updated version of our program should be written this way (8-main.c):


1
2
3
4
5
6
7
8
9
10
11
12
13
14
15
16
17
18
19
20
21
22
23
24
25
26
27
28
29
30
31
32
33
34
35
36
37
38
39
40
41
42
43
44
45
46
47
48
49
50
51
52
53
54
55
56
57
58
59
60
61
62
63
64
#include <stdio.h>;
#include <stdlib.h>;
#include <unistd.h>;
/**
* pmem - print mem
* @p: memory address to start printing from
* @bytes: number of bytes to print
*
* Return: nothing
*/
void pmem(void *p, unsigned int bytes)
{
unsigned char *ptr;
unsigned int i;
ptr = (unsigned char *)p;
for (i = 0; i < bytes; i++)
{
if (i != 0)
{
printf(" ");
}
printf("%02x", *(ptr + i));
}
printf("\n");
}
/**
* main - updating with correct checks
*
* Return: EXIT_FAILURE if something failed. Otherwise EXIT_SUCCESS
*/
int main(void)
{
void *p;
int i;
size_t size_of_the_chunk;
size_t size_of_the_previous_chunk;
void *chunks[10];
char prev_used;
for (i = 0; i < 10; i++)
{
p = malloc(1024 * (i + 1));
chunks[i] = (void *)((char *)p - 0x10);
}
free((char *)(chunks[3]) + 0x10);
free((char *)(chunks[7]) + 0x10);
for (i = 0; i < 10; i++)
{
p = chunks[i];
printf("chunks[%d]: ", i);
pmem(p, 0x10);
size_of_the_chunk = *((size_t *)((char *)p + 8));
prev_used = size_of_the_chunk &amp; 1;
size_of_the_chunk -= prev_used;
size_of_the_previous_chunk = *((size_t *)((char *)p));
printf("chunks[%d]: %p, size = %li, prev (%s) = %li\n",
i, p, size_of_the_chunk,
(prev_used? "allocated": "unallocated"), size_of_the_previous_chunk);
}
return (EXIT_SUCCESS);
}


julien@holberton:~/holberton/w/hackthevm3$ gcc -Wall -Wextra -pedantic -Werror 8-main.c -o 8
julien@holberton:~/holberton/w/hackthevm3$ ./8
chunks[0]: 00 00 00 00 00 00 00 00 11 04 00 00 00 00 00 00
chunks[0]: 0x1031000, size = 1040, prev (allocated) = 0
chunks[1]: 00 00 00 00 00 00 00 00 11 08 00 00 00 00 00 00
chunks[1]: 0x1031410, size = 2064, prev (allocated) = 0
chunks[2]: 00 00 00 00 00 00 00 00 11 0c 00 00 00 00 00 00
chunks[2]: 0x1031c20, size = 3088, prev (allocated) = 0
chunks[3]: 00 00 00 00 00 00 00 00 11 10 00 00 00 00 00 00
chunks[3]: 0x1032830, size = 4112, prev (allocated) = 0
chunks[4]: 10 10 00 00 00 00 00 00 10 14 00 00 00 00 00 00
chunks[4]: 0x1033840, size = 5136, prev (unallocated) = 4112
chunks[5]: 00 00 00 00 00 00 00 00 11 18 00 00 00 00 00 00
chunks[5]: 0x1034c50, size = 6160, prev (allocated) = 0
chunks[6]: 00 00 00 00 00 00 00 00 11 1c 00 00 00 00 00 00
chunks[6]: 0x1036460, size = 7184, prev (allocated) = 0
chunks[7]: 00 00 00 00 00 00 00 00 11 20 00 00 00 00 00 00
chunks[7]: 0x1038070, size = 8208, prev (allocated) = 0
chunks[8]: 10 20 00 00 00 00 00 00 10 24 00 00 00 00 00 00
chunks[8]: 0x103a080, size = 9232, prev (unallocated) = 8208
chunks[9]: 00 00 00 00 00 00 00 00 11 28 00 00 00 00 00 00
chunks[9]: 0x103c490, size = 10256, prev (allocated) = 0
julien@holberton:~/holberton/w/hackthevm3$

Is the heap actually growing upwards?


The last question left unanswered is: “Is the heap actually growing upwards?”. From the brk man page, it seems so:


DESCRIPTION
brk() and sbrk() change the location of the program break, which defines the end of the
process’s data segment (i.e., the program break is the first location after the end of
the uninitialized data segment). Increasing the program break has the effect of allocat‐
ing memory to the process; decreasing the break deallocates memory.

Let’s check! (9-main.c)


1
2
3
4
5
6
7
8
9
10
11
12
13
14
15
16
17
18
19
20
21
22
23
24
25
#include <stdio.h>;
#include <stdlib.h>;
#include <unistd.h>;
/**
* main - moving the program break
*
* Return: EXIT_FAILURE if something failed. Otherwise EXIT_SUCCESS
*/
int main(void)
{
int i;
write(1, "START\n", 6);
malloc(1);
getchar();
write(1, "LOOP\n", 5);
for (i = 0; i < 0x25000 / 1024; i++)
{
malloc(1024);
}
write(1, "END\n", 4);
getchar();
return (EXIT_SUCCESS);
}


Now let’s confirm this assumption with strace:


julien@holberton:~/holberton/w/hackthevm3$ strace ./9
execve(“./9”, [“./9”], [/ 61 vars /]) = 0
…
write(1, “START\n”, 6START
) = 6
brk(0) = 0x1fd8000
brk(0x1ff9000) = 0x1ff9000
…
write(1, “LOOP\n”, 5LOOP
) = 5
brk(0x201a000) = 0x201a000
write(1, “END\n”, 4END
) = 4
…
julien@holberton:~/holberton/w/hackthevm3$

clearly, malloc made only two calls to brk to increase the allocated space on the heap. And the second call is using a higher memory address argument (0x201a000 >; 0x1ff9000). The second syscall was triggered when the space on the heap was too small to host all the malloc calls.


Let’s double check with /proc.


julien@holberton:~/holberton/w/hackthevm3$ gcc -Wall -Wextra -pedantic -Werror 9-main.c -o 9
julien@holberton:~/holberton/w/hackthevm3$ ./9
START


julien@holberton:/proc/7855$ ps aux | grep \ ./9$
julien 7972 0.0 0.0 4332 684 pts/9 S+ 19:08 0:00 ./9
julien@holberton:/proc/7855$ cd /proc/7972
julien@holberton:/proc/7972$ cat maps
…
00901000-00922000 rw-p 00000000 00:00 0 [heap]
…
julien@holberton:/proc/7972$

->; 00901000-00922000 rw-p 00000000 00:00 0 [heap]

Let’s hit Enter and look at the [heap] again:


LOOP
END


julien@holberton:/proc/7972$ cat maps
…
00901000-00943000 rw-p 00000000 00:00 0 [heap]
…
julien@holberton:/proc/7972$

->; 00901000-00943000 rw-p 00000000 00:00 0 [heap]

The beginning of the heap is still the same, but the size has increased upwards from 00922000 to 00943000.


The Address Space Layout Randomisation (ASLR)


You may have noticed something “strange” in the /proc/pid/maps listing above, that we want to study:


The program break is the address of the first location beyond the current end of the data region – so the address of the first location beyond the executable in the virtual memory. As a consequence, the heap should start right after the end of the executable in memory. As you can see in all above listing, it is NOT the case. The only thing that is true is that the heap is always the next memory region after the executable, which makes sense since the heap is actually part of the data segment of the executable itself. Also, if we look even closer, the memory gap size between the executable and the heap is never the same:


Format of the following lines: [PID of the above maps listings]: address of the beginning of the [heap] – address of the end of the executable = memory gap size


  • [3718]: 01195000 – 00602000 = b93000

  • [3834]: 024d6000 – 00602000 = 1ed4000

  • [4014]: 00e70000 – 00602000 = 86e000

  • [4172]: 01314000 – 00602000 = d12000

  • [7972]: 00901000 – 00602000 = 2ff000


It seems that this gap size is random, and indeed, it is. If we look at the ELF binary loader source code (fs/binfmt_elf.c) we can find this:


1
2
3
4
5
6
7
if ((current->;flags &amp; PF_RANDOMIZE) &amp;&amp; (randomize_va_space >; 1)) {
current->;mm->;brk = current->;mm->;start_brk =
arch_randomize_brk(current->;mm);
#ifdef compat_brk_randomized
current->;brk_randomized = 1;
#endif
}


where current->;mm->;brk is the address of the program break. The arch_randomize_brk function can be found in the arch/x86/kernel/process.c file:


1
2
3
4
5
unsigned long arch_randomize_brk(struct mm_struct *mm)
{
unsigned long range_end = mm->;brk + 0x02000000;
return randomize_range(mm->;brk, range_end, 0) ? : mm->;brk;
}


The randomize_range returns a start address such that:


1
2
[...... <range>; .....]
start end


Source code of the randomize_range function (drivers/char/random.c):


/
randomize_range() returns a start address such that
[…… ; …..] start end
a ; with size “len” starting at the return value is inside in the
area defined by [start, end], but is otherwise randomized. /
unsigned long
randomize_range(unsigned long start, unsigned long end, unsigned long len)
{
unsigned long range = end - len - start;

if (end <= start + len)
return 0;
return PAGE_ALIGN(get_random_int() % range + start);
}

As a result, the offset between the data section of the executable and the program break initial position when the process runs can have a size of anywhere between 0 and 0x02000000. This randomization is known as Address Space Layout Randomisation (ASLR). ASLR is a computer security technique involved in preventing exploitation of memory corruption vulnerabilities. In order to prevent an attacker from jumping to, for example, a particular exploited function in memory, ASLR randomly arranges the address space positions of key data areas of a process, including the positions of the heap and the stack.


The updated VM diagram


With all the above in mind, we can now update our VM diagram:


Virtual memory diagram


malloc(0)


Did you ever wonder what was happening when we call malloc with a size of 0? Let’s check! (10-main.c)


1
2
3
4
5
6
7
8
9
10
11
12
13
14
15
16
17
18
19
20
21
22
23
24
25
26
27
28
29
30
31
32
33
34
35
36
37
38
39
40
41
42
43
44
45
46
47
48
#include <stdio.h>;
#include <stdlib.h>;
#include <unistd.h>;
/**
* pmem - print mem
* @p: memory address to start printing from
* @bytes: number of bytes to print
*
* Return: nothing
*/
void pmem(void *p, unsigned int bytes)
{
unsigned char *ptr;
unsigned int i;
ptr = (unsigned char *)p;
for (i = 0; i < bytes; i++)
{
if (i != 0)
{
printf(" ");
}
printf("%02x", *(ptr + i));
}
printf("\n");
}
/**
* main - moving the program break
*
* Return: EXIT_FAILURE if something failed. Otherwise EXIT_SUCCESS
*/
int main(void)
{
void *p;
size_t size_of_the_chunk;
char prev_used;
p = malloc(0);
printf("%p\n", p);
pmem((char *)p - 0x10, 0x10);
size_of_the_chunk = *((size_t *)((char *)p - 8));
prev_used = size_of_the_chunk &amp; 1;
size_of_the_chunk -= prev_used;
printf("chunk size = %li bytes\n", size_of_the_chunk);
return (EXIT_SUCCESS);
}


julien@holberton:~/holberton/w/hackthevm3$ gcc -Wall -Wextra -pedantic -Werror 10-main.c -o 10
julien@holberton:~/holberton/w/hackthevm3$ ./10
0xd08010
00 00 00 00 00 00 00 00 21 00 00 00 00 00 00 00
chunk size = 32 bytes
julien@holberton:~/holberton/w/hackthevm3$

->; malloc(0) is actually using 32 bytes, including the first 0x10 bytes.


Again, note that this will not always be the case. From the man page (man malloc):


NULL may also be returned by a successful call to malloc() with a size of zero

Outro


We have learned a couple of things about malloc and the heap. But there is actually more than brk and sbrk. You can try malloc’ing a big chunk of memory, strace it, and look at /proc to learn more before we cover it in a next chapter 🙂


Also, studying how free works in coordination with malloc is something we haven’t covered yet. If you want to look at it, you will find part of the answer to why the minimum chunk size is 32 (when we ask malloc for 0 bytes) vs 16 (0x10 in hexadecimal) or 0.


As usual, to be continued! Let me know if you have something you would like me to cover in the next chapter.


Questions? Feedback?


If you have questions or feedback don’t hesitate to ping us on Twitter at @holbertonschool or @julienbarbier42.

Haters, please send your comments to /dev/null.


Happy Hacking!


Thank you for reading!


As always, no-one is perfect (except Chuck of course), so don’t hesitate to contribute or send me your comments if you find anything I missed.


Files


This repo contains the source code (naive_malloc.c, version.c & “X-main.c` files) for programs created in this tutorial.


Read more about the virtual memory


Follow @holbertonschool or @julienbarbier42 on Twitter to get the next chapters!


  • Chapter 0: Hack The Virtual Memory: C strings & /proc

  • Chapter 1: Hack The Virtual Memory: Python bytes

  • Chapter 2: Hack The Virtual Memory: Drawing the VM diagram

  • Chapter 3: Hack the Virtual Memory: malloc, the heap & the program break


Many thanks to Tim, Anne and Ian for proof-reading! 🙂


Sharing is caringShare on RedditTweet about this on TwitterShare on FacebookShare on Google+Share on LinkedInDigg thisShare on StumbleUpon

</div>

深入理解Linux中内存管理

发表于 2017-09-13 | 分类于 linux-c

Linux内存管理

平常只是知道一些进程虚拟地址空间的一些概念,并没有深入去理解Linux是如何管理内存了,刚好有时间就研究了下这块的原由。

主题:Linux内存管理中的分段和分页技术

回顾一下历史,在早期的计算机中,程序是直接运行在物理内存上的。换句话说,就是程序在运行的过程中访问的都是物理地址。

如果这个系统只运行一个程序,那么只要这个程序所需的内存不要超过该机器的物理内存就不会出现问题,我们也就不需要考虑内存管理这个麻烦事了,反正就你一个程序,就这么点内存,吃不吃得饱那是你的事情了。

然而现在的系统都是支持多任务,多进程的,这样CPU以及其他硬件的利用率会更高,这个时候我们就要考虑到将系统内有限的物理内存如何及时有效的分配给多个程序了,这个事情本身我们就称之为内存管理。

举一个早期的计算机系统中,内存分配管理的例子,以便于理解。

假如我们有三个程序,程序A,B,C,程序A运行的过程中需要10M内存,程序B运行的过程中需要100M内存,而程序C运行的过程中需要20M内存。

如果系统同时需要运行程序A和B,那么早期的内存管理过程大概是这样的,将物理内存的前10M分配给A,接下来的10M-110M分配给B。

这种内存管理的方法比较直接,好了,假设我们这个时候想让程序C也运行,同时假设我们系统的内存只有128M,显然按照这种方法程序C由于内存不够是不能够运行的。

大家知道可以使用虚拟内存的技术,内存空间不够的时候可以将程序不需要用到的数据交换到磁盘空间上去,已达到扩展内存空间的目的。

下面来看看这种内存管理方式存在的几个比较明显的问题。

进程地址空间不能隔离

由于程序直接访问的是物理内存,这个时候程序所使用的内存空间不是隔离的。

举个例子,就像上面说的A的地址空间是0-10M这个范围内,但是如果A中有一段代码是操作10M-128M这段地址空间内的数据,那么程序B和程序C就很可能会崩溃(每个程序都可以访问系统的整个地址空间)。这样很多恶意程序或者是木马程序可以轻而易举地破快其他的程序,系统的安全性也就得不到保障了,这对用户来说也是不能容忍的。

内存使用的效率低 

如上面提到的,如果我们要像让程序A、B、C同时运行,那么唯一的方法就是使用虚拟内存技术将一些程序暂时不用的数据写到磁盘上,在需要的时候再从磁盘读回内存。

这里程序C要运行,将A交换到磁盘上去显然是不行的,因为程序是需要连续的地址空间的,程序C需要20M的内存,而A只有10M的空间,所以需要将程序B交换到磁盘上去,而B足足有100M,可以看到为了运行程序C我们需要将100M的数据从内存写到磁盘,然后在程序B需要运行的时候再从磁盘读到内存,我们知道IO操作比较耗时,所以这个过程效率将会十分低下。

程序运行的地址不能确定

程序每次需要运行时,都需要在内存中分配一块足够大的空闲区域,而问题是这个空闲的位置是不能确定的,这会带来一些重定位的问题,重定位的问题确定就是程序中引用的变量和函数的地址,如果有不明白童鞋可以去查查编译原理方面的资料。

  内存管理无非就是想办法解决上面三个问题,如何使进程的地址空间隔离,如何提高内存的使用效率,如何解决程序运行时的重定位问题?

引用计算机界一句无从考证的名言:计算机系统里的任何问题都可以靠引入一个中间层来解决

现在的内存管理方法就是在程序和物理内存之间引入了虚拟内存这个概念。

  1. 虚拟内存位于程序和物理内存之间,程序只能看见虚拟内存,再也不能直接访问物理内存。
  2. 每个程序都有自己独立的进程地址空间,这样就做到了进程隔离。这里的进程地址空间是指虚拟地址。
  3. 顾名思义,既然是虚拟地址,也就是虚的,不是现实存在的地址空间。


  4. 既然我们在程序和物理地址空间之间增加了虚拟地址,那么就要解决怎么从虚拟地址映射到物理地址,因为程序最终肯定是运行在物理内存中的,主要有分段和分页两种技术。

    分段(Segmentation)

    这种方法是人们最开始使用的一种方法,基本思路是将程序所需要的内存地址空间大小的虚拟空间映射到某个物理地址空间。

    每个程序都有其独立的虚拟的独立的进程地址空间可以看到程序A和B的虚拟地址空间都是从0x00000000开始的。我们将两块大小相同的虚拟地址空间和实际物理地址空间一一映射,即虚拟地址空间中的每个字节对应于实际地址空间中的每个字节,这个映射过程由软件来设置映射的机制,实际的转换由硬件来完成。

    这种分段的机制解决了开始提到的3个问题中的进程地址空间隔离和程序地址重定位的问题。

    程序A和程序B有自己独立的虚拟地址空间,而且该虚拟地址空间被映射到了互相不重叠的物理地址空间,如果程序A访问虚拟地址空间的地址不在0x00000000-0x00A00000这个范围内,那么内核就会拒绝这个请求,所以它解决了隔离地址空间的问题。我们应用程序A只需要关心其虚拟地址空间0x00000000-0x00A00000,而其被映射到哪个物理地址我们无需关心,所以程序永远按照这个虚拟地址空间来放置变量,代码,不需要重新定位。

    无论如何分段机制解决了上面两个问题,是一个很大的进步,但是对于内存效率问题仍然无能为力。   

    因为这种内存映射机制仍然是以程序为单位,当内存不足时仍然需要将整个程序交换到磁盘,这样内存使用的效率仍然很低。

    那么,怎么才算高效率的内存使用呢。事实上,根据程序的局部性运行原理,一个程序在运行的过程当中,在某个时间段内,只有一小部分数据会被经常用到。

    所以我们需要更加小粒度的内存分割和映射方法,此时是否会想到Linux中的Buddy算法和slab内存分配机制呢。另一种将虚拟地址转换为物理地址的方法分页机制应运而生了。

    分页机制

    分页机制就是把内存地址空间分为若干个很小的固定大小的页,每一页的大小由内存决定,就像Linux中ext文件系统将磁盘分成若干个Block一样,这样做是分别是为了提高内存和磁盘的利用率。

    试想一下,如果将磁盘空间分成N等份,每一份的大小(一个Block)是1M,如果我想存储在磁盘上的文件是1K字节,那么其余的999字节是不是浪费了。所以需要更加细粒度的磁盘分割方式,我们可以将Block设置得小一点,这当然是根据所存放文件的大小来综合考虑的,好像有点跑题了,我只是想说,内存中的分页机制跟ext文件系统中的磁盘分割机制非常相似。

    Linux中一般页的大小是4KB我们把进程的地址空间按页分割,把常用的数据和代码页装载到内存中,不常用的代码和数据保存在磁盘中,我们还是以一个例子来说明,如下图:

    可以看到进程1和进程2的虚拟地址空间都被映射到了不连续的物理地址空间内(这个意义很大,如果有一天我们的连续物理地址空间不够,但是不连续的地址空间很多,如果没有这种技术,我们的程序就没有办法运行),甚至他们共用了一部分物理地址空间,这就是共享内存。

    进程1的虚拟页VP2和VP3被交换到了磁盘中,在程序需要这两页的时候,Linux内核会产生一个缺页异常,然后异常管理程序会将其读到内存中。

    这就是分页机制的原理,当然Linux中的分页机制的实现还是比较复杂的,通过了页全局目录,页上级目录,页中级目录,页表等几级的分页机制来实现的,但是基本的工作原理是不会变的。

    分页机制的实现需要硬件的实现,这个硬件名字叫做MMU(Memory Management Unit),他就是专门负责从虚拟地址到物理地址转换的,也就是从虚拟页找到物理页。

    参考
    重定位

    如何构建一个go项目

    发表于 2017-09-12 | 分类于 golang

    介绍

    在这里我会介绍开发一个简单的Go包以及对go tool的使用。最标准的方法是先拉取,编译再安装Go包然后再到命令行运行。

    go tool需要你按特定的方式组织你的代码.接下来请仔细阅读.

    代码组织

    概览

    • Go程序通常把所有的Go代码放在单一的工作空间
    • 工作空间包含各种版本控制的库(如:git管理的库)
    • 每一个库包含一个或多个包
    • 每一个包由单个目录下面的一个或多个go文件组成
    • 包的路径决定了它导入的路径

    注意要和其它Go程序区分开来,每个Go的项目都有自己的工作空间并且工作空间是和版本控制库是紧密联系在一起的。

    工作空间

    一个工作空间是包含有三子目录的目录:

    • src包信Go的源文析
    • pkg包含仓库生成对应的包
    • bin包含我们生成Go的可执行程序

    go tool编译所有的包并安装二进制文件到pkg和bin目录
    src子目录通常包含多个版本控制的库,这里面包含一个或多个包

    一个工作空间看来是是这样的:

    1
    2
    3
    4
    5
    6
    7
    8
    9
    10
    11
    12
    13
    14
    15
    16
    17
    18
    19
    20
    21
    22
    23
    24
    bin/
    hello # command executable
    outyet # command executable
    pkg/
    linux_amd64/
    github.com/golang/example/
    stringutil.a # package object
    src/
    github.com/golang/example/
    .git/ # Git repository metadata
    hello/
    hello.go # command source
    outyet/
    main.go # command source
    main_test.go # test source
    stringutil/
    reverse.go # package source
    reverse_test.go # test source
    golang.org/x/image/
    .git/ # Git repository metadata
    bmp/
    reader.go # package source
    writer.go # package source
    ... (many more repositories and packages omitted) ...

    上面的结构包含两个库(example和image).example库包含两个可执行程序和一个库。image仓库包含bmp包和一些其它的。

    一个典型的工作空间是包含多个仓库源,每个仓库包含多个包或可执行程序。大部分Go程序保持所有Go源码和依赖放在同一个工作空间。

    可执行程序和程序所需要的库是从不同的包里生成的。我们稍后会讨论他们的区别。

    GOPATH环境变量

    GOPATH环境变量指定了工作空间的位置.linux默认是~/go,windows下面是C:\Users\YourName\go。

    如果你喜欢在不同的位置工作,你需要设置下GOPATH指向你想要的那个目录(另一个常见的设置是GOPATH=$HOME),注意GOPATH不要和Go安装的目录相同。

    go env GOPATH输出当前生效的GOPATH,如果没有设置会输出默认的值。

    为了方便把工作目录的bin子目录设置加入到系统PATH:

    1
    $export PATH=$PATH:$(go env GOPATH)/bin

    Import paths

    一个导入路径是标识唯一个包的一串字符。一个包导入路径对应它在工作空间里面的目录或是一个远程仓库。

    标准库的包导入路径非常短,比如:”fmt”、”net/http”.对于自己的包来说,你必须选择将来加入一些标准库或其它外部库不太可能会产生冲突的基础路径。

    如果你把代码放在某个开源仓库,你应该仓库的根目录做为你的基础路径。比如:你的github帐号是github.com/user,这应该是你的基础路径。

    注意在你可以编译之前最好不要发布你的代码到远程仓库。这是一个好的习惯来组织你的代码如果你在将来某一天发布。事实上你可以选择其它任意的目录名称,只要它对标准库和Go生态生成的路径唯一就好。

    接下来我们会用github.com/user做为我们的基础路径。在你的工作空间创建一个目录来放你的源码:

    1
    $mkdir -p $GOPATH/src/github.com/user

    第一个Go程序

    编译和运行一个程序首先需要选择一个包路径(我们用github.com/user/hello)然后在你的工作空间创建相应的包路径:

    1
    $ mkdir $GOPATH/src/github.com/user/hello

    接下来我们在目录下面创建一个叫hello.go的文件,文件内容如下:

    1
    2
    3
    4
    5
    6
    7
    package main
    import "fmt"
    func main() {
    fmt.Printf("Hello, world.\n")
    }

    现在你可以用go tool编译然后安装这个程序:

    1
    $ go install github.com/user/hello

    注意你可以在你电脑的任何地方运行这个命令。go tool会在你的GOPATH查找github.com/user/hello对应的包。

    如果你在包的目录下面运行go install话,你可以忽略包的路径:

    1
    2
    $ cd $GOPATH/github.com/user/hello
    $ go install

    这个命令编译hello生成一个可执行文件。然后安装这个二进制文件到工作空间的bin目录下,生成的名字是hello(windows下是hello.exe)。在我们的例子会在$GOPATH/bin/hello,也就是$HOME/go/bin/hello.

    go tool只会在有错误的情况下输出,如果没有任何输出说明是执行成功。

    现在你可以在命令行输入绝对路径来运行你的程序:

    1
    $ $GOPATH/bin/hello

    或者你已经把$GOPATH/bin加入到系统PATH了,你只需要输入:

    1
    2
    $ hello
    Hello, world.

    如果你正在用一个版本控制系统,那么现在是初始化一个仓库的最佳时机,新增这些文件,然后提交你第一次变更。再强调一次,这一步是可选的:你不需要用源代码控制系统来写Go代码。

    1
    2
    3
    4
    5
    6
    7
    8
    $ cd $GOPATH/src/github.com/user/hello
    $ git init
    Initialized empty Git repository in /home/user/work/src/github.com/user/hello/.git/
    $ git add hello.go
    $ git commit -m "initial commit"
    [master (root-commit) 0b4507d] initial commit
    1 file changed, 1 insertion(+)
    create mode 100644 hello.go

    第一个库

    让我们写一个库并在hello程序里面使用这个库

    再说下,第一步创建包路径:

    1
    $ mkdir $GOPATH/src/github.com/user/stringutil

    接下来在目录下创建一个reverse.go的文件,内容如下:

    1
    2
    3
    4
    5
    6
    7
    8
    9
    10
    11
    // Package stringutil contains utility functions for working with strings.
    package stringutil
    // Reverse returns its argument string reversed rune-wise left to right.
    func Reverse(s string) string {
    r := []rune(s)
    for i, j := 0, len(r)-1; i < len(r)/2; i, j = i+1, j-1 {
    r[i], r[j] = r[j], r[i]
    }
    return string(r)
    }

    现在我们用go build来编译这个包:

    1
    $ go build github.com/user/stringutil

    或进入目录:

    1
    $ go build

    这个不会产生文件。为了这样做,你必须用go install把这个包放到你工作空间的pkg目录。

    在你确实stringutil包编译成功后,修改你原先的hello.go代码:

    1
    2
    3
    4
    5
    6
    7
    8
    9
    10
    11
    package main
    import (
    "fmt"
    "github.com/user/stringutil"
    )
    func main() {
    fmt.Printf(stringutil.Reverse("!oG ,olleH"))
    }

    运行我们的程序,结果如下:

    1
    2
    $ hello
    Hello, Go!

    经过上面的步骤后,我们的工作空间如下:

    1
    2
    3
    4
    5
    6
    7
    8
    9
    10
    11
    12
    bin/
    hello # command executable
    pkg/
    linux_amd64/ # this will reflect your OS and architecture
    github.com/user/
    stringutil.a # package object
    src/
    github.com/user/
    hello/
    hello.go # command source
    stringutil/
    reverse.go # package source

    包名

    在Go的源码里面第一条语句必需是:

    1
    package name

    name是包默认的名字用来导入。(一个包里所有的文件必须用同一个name)

    Go的转换规则是把导入路径最后一个元素做为包名的:如果”crypto/rot13”导入的话name应该命名为rot13.

    可执行的命令必须用package main.

    在链接到一个二进制文件的时候不要求所有包里的名称都唯一,但是导入的路径必须唯一。

    测试

    Go有一个轻微测试框,由go test命令和testing包组成。

    新建一个以_test.go结尾的文件名来做为测试,文件里面包含类TestXXX(t *testing.T)的函数。测试框架会运行每一个这样的函数;如果函数用T.Error或t.Fail调用失败,这个测试是被认为失败了。

    到stringutil包里新增一个测试文件($GOPATH/src/github.com/user/stringutil/reverse_test.go),内容如下:

    1
    2
    3
    4
    5
    6
    7
    8
    9
    10
    11
    12
    13
    14
    15
    16
    17
    18
    19
    package stringutil
    import "testing"
    func TestReverse(t *testing.T) {
    cases := []struct {
    in, want string
    }{
    {"Hello, world", "dlrow ,olleH"},
    {"Hello, 世界", "界世 ,olleH"},
    {"", ""},
    }
    for _, c := range cases {
    got := Reverse(c.in)
    if got != c.want {
    t.Errorf("Reverse(%q) == %q, want %q", c.in, got, c.want)
    }
    }
    }

    运行这个测试:

    1
    2
    $ go test github.com/user/stringutil
    ok github.com/user/stringutil 0.165s

    同样的,可以在包里面运行这个测试:

    1
    2
    $ go test
    ok github.com/user/stringutil 0.165s

    远程包

    包的导入描述了是怎样通过版本控制系统获取包的源码的(如:git或Mercurial).go tool利用这个特性从远程仓库获取这个包。例如,在这个文章里面example是放在Github上面的(github.com/golang/example)。如果你在包的导入路径添加了这个地址,go get将会自动拉取、编译和安装:

    1
    2
    3
    $ go get github.com/golang/example/hello
    $ $GOPATH/bin/hello
    Hello, Go examples!

    如果指定的包不存在当前的工作空间,go get将会把包放到由GOPATH指定的工作空间里面。(如果这个包已经在工作空间中存在,go get跳过从远程的拉取和安装)

    执行上面go get命令后,现在的工作空间目录结构是这样的:

    1
    2
    3
    4
    5
    6
    7
    8
    9
    10
    11
    12
    13
    14
    15
    16
    17
    18
    19
    20
    21
    22
    bin/
    hello # command executable
    pkg/
    linux_amd64/
    github.com/golang/example/
    stringutil.a # package object
    github.com/user/
    stringutil.a # package object
    src/
    github.com/golang/example/
    .git/ # Git repository metadata
    hello/
    hello.go # command source
    stringutil/
    reverse.go # package source
    reverse_test.go # test source
    github.com/user/
    hello/
    hello.go # command source
    stringutil/
    reverse.go # package source
    reverse_test.go # test source

    托管在Gihub上的hello程序和它依赖stringutil包在同一个仓库。在hello.go文件里用相同的导入路径转换,所以go get命令找到和安装依赖包到对应的目录。

    1
    import "github.com/golang/example/stringutil"

    英语很渣的一个翻译
    参考

    12

    易斌

    20 日志
    5 分类
    19 标签
    © 2018 易斌
    由 Hexo 强力驱动
    |
    主题 — NexT.Muse v5.1.2